Sunday, November 29, 2020

Installing The Bachmann Interlocking Tower

I received the Badhmann Lackawanna interlocking tower I ordered. The first thing I did was repaint the tiles on the roof a terra cotta green, which amny of the prototypes seemed to be:
Here's a prototype photo I found on the web that gives some idea of the roof color, as well as the actual concrete color:
It looks like I'm going to have to find some Aged Concrete paint and see what I can do to dry-bruh it to enhance the color.

In this post a few eeeks ago, I talked about prepping a scenery area in West Zenith for placing the new concrete interlocking tower.

Once I'd installed it, I tried out a couple of new photo angles on the layout that would feature it:

I'd wound up leveling half of a small hill, which was a blah scenic area with no particular interest to it. By creating a new point of interest in the tower, I think I've perked up a new part of the layout. I have to level up the tower, dirt it in, and reinstall trees and ground cover in the overall area.

Sunday, November 22, 2020

Looking At The Bachmann Jersey Central GP7

I've known for several years that Bachmann has a version of their GP7 in Jersey Central paint. This is a loco from my childhood, as my grandparents lived about a block from the New Your and Long Branch in North Asbury Park, and when we visited, it was just a short walk to railfan trains at the station there.

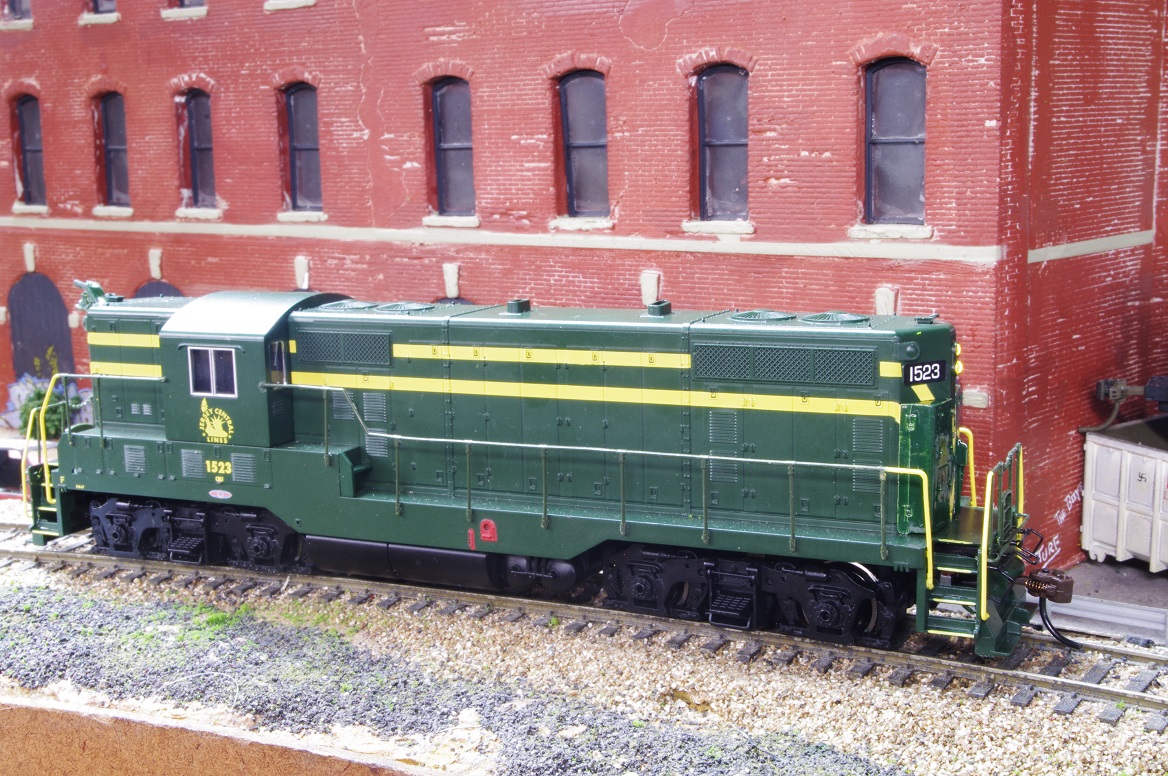
But not long ago, I noticed that TrainWorld was clearing out its Bachmann Jersey Central GP7s, and I'd better pick one up, especially at the clearance price. The reason I'd hesitated up to now was that there's one important difference between the prototype and the model, and I wasn't sure if I wanted to deal with it.

The Jersey Central GP7s all had long hood extensions that housed electric generators for train lightibg:

Whereas the Bachmann model from the box just follows standard EMD GP7 features:
But leaving that discrepancy aside, I think Bachmann did a very good job with the paint and lettering. For innstance, I thought at first that the number beneath Miss Liberty on the cab side was too small, but I went checking photos on the web and discovered Bachmann had noticed something important: given the Jersey Central's standard lettering placement, the GP7 cabside numbers went between two louvers on the battery box doors. There was too little space there to fit standard numbers.

It looks like some GP7s got alightly larger numbers on plates welded to the louvers, while others may have had numbers the small Bachmann size.

For the train lighting generator, Custom Finishing makes part 213 for this in HO. You just clean up the castings, paint them, and super glue them to the long hood end:

The problem is what color matches the Jersey Central green (I think they called it Sea Foam Green). I've read that Chicago & North Western green is close, and I may have tried this in the past and liked it. However, I'm out of CNW green, and we're no longer in an age where you can just run out to the train store and pick up a bottle. I scrounged in the paint I had and discovered I had some Scalecoat Southern Railway green, which turns out to be at least an OK match:

Now I just need to scrounge a decal with the deep yellow "V" to apply to the end. I think I have an old Walthers set I can use. At that point, minimal weathering will cover any slight difference between the green shades. I also added a Custom Finishing 246 GP7 high hood bell to the short hood:
I notice that the Bachmann Jersey Central green is a good match for the green on the Atlas Jersey Central Train Master:

Sunday, November 15, 2020

And Even More Scenery Work

I made a trip to the train store this past week and came back with a big grocery-size shopping bag full of Woodland Scenics items. The result is that the hardshell on the big promontory that surrounds the sewer pipes is about 90% covered, with work underway on rock molds and dirt surface, with vegetation starting to cover things.

I completed coloring the plaster rock castings on the East Coast scenery-based side of the pomontory. The part of the hardshell that isn't covered by rockwork has been fully covered with Sculptamold mixed with cheap acrylics.

The next step will be to add extensive trees and clump foliage to this general area, covering a fair amount of the castings as well.

The photo below shows clump foliage being inserted into the rock crevices in the Woodland Scenics Ready Rocks that have been installed. A great deal more remains to be done.

The photo below shows the remaining plaster cloth hard shell that hasn't yet been covered with Sculptamold or Ready Rocks. This will be the last phase of the project to scenic the sewer pipe promontory.
I added a piece of Masonite to serve as a base for the Bachmann Lackawanna tower that will be installed at West Zenith. This is on its way.
The next step will be to finish off the open9ng with plaster cloth and add a retaining wall to the cut-off part of the hillside.

Sunday, November 8, 2020

Sprucing Up West Zenith

I turned my attention to the West Zenith area over the past week, mostly because I've belatedly taken up the project of replacing layout fascia that I'd removed when I replaced the DC block wiring with the 24 AWG DCC bus. Here is the fascia section replaced, along with the former DC local panel for the area:
The toggles are variously for a reversing section, cab assingment to blocks, and Tortoise control. In several cases, former pushbuttons for twin-coil machines had already been replaced with Tortoise toggles. However, this has pretty much all now been superseded, and the only electrical controls that are still used here are the red pushbuttons for Kadee electric uncouplers.

So in the near future, I will remove all the remaining toggles and cover the holes with labels that give the decoder addresses for the DCC switch decoders now in use.

But while I was starting this project, I ran across a Bachmann 35714 signal tower that had just arrived at MB Klein (Bachmann photo):

This is built up. It's a Lackawanna standard concrete signal tower. I grew up in part along the Lackawanna, and I always admired its architecture. It's reasonably priced, built up, and in fact less expensive than laser cut or urethane kits for the same prototype, so I had to have it. The obstacle was where to put it. Then I realized that if I cut away some hardshell in the West Zenith area, I could tackle this in the same project as reinstalling the fascia.

The hill shown below hadn't had serious attention in at least 20 years. It was dusty and beat-up, and it was scenically blah:

I measured the dimensions of the Bachmann tower given on the MB Klein website and realized that I could logically locate it here if I hacked away at the hardshell of the scenery and cleared out enough space for a base.
I used a Dremel with a cutting disk and an X-Acto knife.
I still need to clean up the area with the shop vac. Then I can cantilever over the open space with a piece of foamcore cut to size for the tower base and cover things back up with new hardshell from plaster cloth.

The Bachmann tower should arrive in a week or so.

Sunday, November 1, 2020

Yet More Scenery Work

My layout area, while about half the size of John Allen's last G&D, has some similarities. It's in a semi-finished basement with a number of pipes and columns in challenging places, and since John Allen has always been an inspiration, I've definitely followed his lead on what to do with inconvenient pipes and columns.

The biggest problem has been a column surrounded by several sewage drain pipes. I've hated this area so much over the years that I see I've never taken a full-on photo of it in its natural state. But here's a view that shows part of the problem from 1995 in an early phase of layout constructon:

As you can see, track and roadbed dodge around the column and pipes. My basic approach was John Allen's, which I've used throughout the layout: cover the columns with scenery or tall buildings. Here is an example of a column concealed in a geologic feature called the Devil's Post Pile on the G&D, from a photo I found on the webz:
I've gradually worked my way into surrounding the pipes with a big rock formation. The track next to the wall in the top photo goes into the Moffat Tunnel on my layout. Here is that track seen from the opposite direction with more scenery work under way:
And work under way to create a big geologic feature to cover the whole horror, at least as much as it can:
Over several years of very slow work, I've covered things with plaster cloth and then added rock molds at variouis times. There's an added wrinkle to scnery work here, in that my idea is to have Eastern style scenery on the left of the mountain, and Western style scenery on the right. Here's the current state of the Eastern side:
My inspiration here is to follow generally locations in the Breaks Interstate Park in Kentucky and Virginia like the scene below:
Clearly I'll need to add a lot of clump foliage.

The other side of the mountain, with Western scenery, will be based on the Castle Gate area in Utah. Here's an 1898 color postcard showing the area that I found on the web:

I frecntly found a Woodland Scenics product, Woodland Scenics "Shelf Rocks" Ready Rocks, which are precast and prepainted plaster. I've used rock molds that I pour and add myself for many years, but these turn out to be a lot easier, and the rock pattern looks like something I can use for the Castle Gate side of the mountain:
I attach the Ready Rocks to the plaster cloth with Scultpamold colored with cheap acryics added and mixed with Elmer's glue. There's more work to be done, but now I have a basic plan of attack for finishing the area.