Sunday, December 18, 2022

Atlas Classic Minneapolis & St Louis RS-1

The Atlas HO RS-1, in either its original Atlas Kato version or the made-in-China Atlas Classic version, continues to be one of my favorite locomotives. It's simple, it has a heavy chassis and a smooth running mechanism. I like to find them in the more obscure road names. I recently found a better-than-usual price on eBay for one in Minneapolis & St Louis. The M&StL disappeared in the first wave of railroad mergers around 1960, along with roads like the Virginian and the Lackawanna. The M&StL used RS-1s as both yard switchers and road switchers. Their only other road units were EMD Fs until they acquired GP9s late in the road's history.
I did some research and found that the M&StL had an almost unique number system that was based on the month and year the unit was acquired. Thus RS-1 845 was acquired in August, 1945. The only other railroad I'm aware of that used this system was the Henry Becker dairy farm railroad, the Centerville and Southwestern, a 9-7/16" guage line that operated in Roseland, NJ. This system was used on its rolling stock, but not its locomotives.

A change of management in the late 1950s led to a renumbering of M&StL's locomotives into a more typical system that put them into classes based on model.

I'm not sure when, or even whether, Atlas added an 8-pin DCC socket to this model. Even in the Atlas Classic range, most or all that I've found need to have the PC board replaced with a decoder based on the original shape and mounting method. I've settled on the Digitrax DH165A0. The advantage of these is that a resistance for LEDs is built in, so especially with the Classic version, it's possible just to bend up the leads so the LEDs face the light bars without modification and soilder them directly to the decoder as shown here.

Sunday, December 11, 2022

Back To Scenery On The HO Layout

Over the past week I returned to some overdue scenery work on my main HO layout. I'd built a Bar Mills Bull's Salvage kit and surrounded it with additional junk piles from assorted manufacturers, but I'd left the scenery behind it half done. Not long ago, I picked up a pack of Woodland Scenics Ready Rocks, not quite having an idea of what I'd use them for. I've long since finished most of the rockwork on my layout, but Ready Rocks are useful for smaller areas, since they avoid the trouble and mess of mixing plaster, pouring it into molds, and coloring the castings.
I bulked up the cardboard lattice, which I'd already started for hardshell, and clamped a Ready Rocks Shelf Rock casting directly to it, using silicone calk to glue things together. I'll add more cardboard lattice and probably another Ready Rocks casting to the right, and then I'll finish around the edges of the castings with plaster cloth covered with Sculptamold.

Sunday, December 4, 2022

The METRA Fox Lake Line In 1997

I recently found some photos I'd taken 25 years ago while I was visiting family in Chicago. I had a chance to take a quick ride on the METRA Fox Lake line while I was there. I'm now glad I did, since much of what I saw is gone.

After leaving Union Station, the train passed the Western Avenue coach yard.

I caught some shots of scap rail and ties along the right of way:
It looks like 25 years ago, the Rondout tower was still in service, with even a platform for the operator to hand up orders. I checked Google Maps, and all this is now completely gone.
The F40Cs that operated on this line were withdrawn in 2004.

Sunday, November 27, 2022

A Reminder Of The Start Of The Freight Car Graffiti Era

I just rediscovered this photo I took on Cajon Pass sometime in early BNSF but pre-triple track in the late 1990s. What's most notable is that it dates from the early freight car graffiti period, where I would see just occasional cars with one tag on one side of the door. Soon enough this expanded to tags on both sides all across the car, as things are now.

Cajon Pass in this specific time fame was double track with concrete ties, with the telegraph lines still in place. This would quickly change.

Sunday, November 20, 2022

Scenery On The N Micros

I'm slowly doing scenery work on my N 3-2-2 Inglenook and interchangeable quasi-T-TRAK modules I collectively call the Ingle Secondary. Running in and debugging the track are making good progress.
I added Woodland Scenics light green edging strips to the edges of the channel. This will eventually be filled with Woodland Scenics water.
The structures are from Custom Z Scale so far. These are card kits, cut and scored for assembly, and are very reasonably priced.
The dummy track that crosses the main on a diamond isn't really a dummy, I've wired it as the Digitrax programming track, and it works very well.

Sunday, November 13, 2022

More Work With The Cardboard T-TRAK Module

Since I'm using recycled cardboard and track and scenery components from former layouts, this is all a cheap experiment, and if it doesn't work out, I can just deconstruct things or toss it all. But I have a number of DVDs covering Norfolk Southern operations on its Pocahontas Division, especially some of the coal branches, and I wanted to try to see what kind of Virginia-West Virginia coal branch scenery I could squeeze into less than one square foot.
I had a couple of tunnel portals from former N layouts that I decided to reuse. One is an old Alexander Scale Models Lough portal; the other is a Chooch rock portal. I set them up about an inch and a half apart. The short length of the "tunnel" will be concealed with scenery.
I tested the clearances with a Micro Trains high cube boxcar. I had to raise the Chooch rock portal with my Dremel.
I added profiles for the eventual landforms with more corrugated cardboard. Hardshell lattice will be attached to these.
Here's a view of the side with the Chooch rock portal.
I drove an hour to a hobby shop that carries Arizona Rock & Mineral ballast. I found some N White Limestone ballast that matches what the NS uses on its Buchanan Branch. Again, the switch is an old Peco that I damaged removing it from an old layout. It's scenery only and will lead to an abandoned spur.

Sunday, November 6, 2022

Corrugated Cardboard T-TRAK Architecture

Now and then I've seen references to building T-TRAK modules from corrugated cardboard. One modeler on his website said he had to get ready for a meet, but he lacked an important module for the intended plan. Looking for a quick solution, he settled on buidling a temporary module from corrugated cardboard. He wound up surprised at how robust it proved to be, and it wound up being a permanent part of his T-TRAK repertoire.
I decided to try a proof-of-concept using corrugated cardboard from packing boxes that had come in from UPS and USPS. They'd otherwise be recycled. I added stiffeners at the corners made from used fireplace matches, and I also added a central stiffening member.
I measured this one out to be full width and half depth, following the dimensions of those that used to be available from Masterpiece Modules. However, the only key dimension is the height, 2-3/4 inches. Even module kits that have been advertised as following T-TRAK standards have some variation, but for home use where you aren't required to fit a layout plan that uses standard modules, you actually have a lot of flexibility in width and depth.
In my case, this is another T-TRAK module I've built using single track. The switch on this one is non-operating, scenery-only using a damaged Peco from a former layout. My first impression is that it's sturdier than I expected and perfectly acceptable for home use.

Sunday, October 30, 2022

Up To Hard Shell On The Rolling Bridge Module

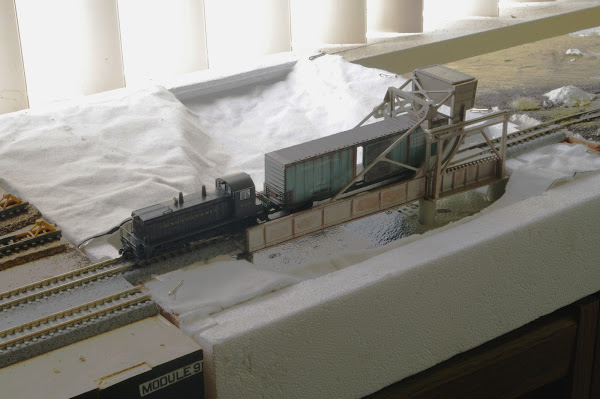
The Kato/Woodland Scenics T-TRAK module kit includes materials for a whole scenic system, including what they call Shaper Sheet, with Woodland Scenics plaster to finish it off. It was interesting to try this method. The photo below shows recesses cut in the foam front and back to accommodate the channel, with Shaper Sheet fitted and cut for the basic scenic contours.
Then I used Sculptamold to fill in all the gaps so the plaster wouldn't leak through when I applied it.
Finally I mixed the plaster according to the kit instructions and applied it to the Shaper Sheet and Sculptamold. I used masking tape around the track and bridge while I did this.
The result is classic hard shell. The next steps will be to sand the plaster smooth and clean things up a little more, and then add color to the surface.

Sunday, October 23, 2022

Scenery Work On The "Rolling Bridge" Module

The Woodland Scenics T-TRAK module kit includes a section of their Shaper Sheet for the scenery. This is just enough to cover the scenic area of the module. I studied the instructions and decided I could use it as intended to create a stream bed under the bridge into which I can eventually add scenic water. I cut out approximately sized pieces with scissors, used a ruler to help bend the sheet to shape the channel, tested it against the module, and cut the pieeces to final size.

I attached the pieces to the sides of the module with silicone caulk held down with the foam pins provided with the module kit.

Then I connected the module as I'd brought it so far to a temporary T-TRAK compatible layout with power so I could test things out.
I got a chepo foam cutter off eBay to cut the shape of the channel into the front and back of the module to match the shape of the channel in the Shaper Sheet.
I'll fill in the various gaps with Sculptamold, sand things smooth, and add a finishing layer of the Shaper Sheet plaster included with the module kit.
The Woodland Scenics T-TRAK module kit is more expensive than ordinary wood module kits from other sources, but it includes track and scenery material that aren't in those kits, and it's the easiest option for adding something like a stream channel below track level.

Sunday, October 16, 2022

More Progress On The "Rolling Bridge"

As I said in my last post, I intend to mount my AHM drawbridge in a single-wide T-TRAK module that's single track but otherwise follows T-TRAK architecture. As it happens, the bridge floor and track that come with the kit, when spliced onto a section of 2-1/2 inch long Unitrack at each end, will just about exactly fit onto a standard single-wide T-TRAK module with roughly 1 mm left over on either end. I wound up shortening one of the Unitrack sections by about 1/16 inch with a cutting disk in a Dremel. I substituted Atlas N rail joiners for the Kato Unijoiners on the ends facing the bridge and soldered everything together.
Then I attached the track assembly to the bridge with CA glue.
And then I mounted that assembly to the kit base, which I had earlier cut down in anticipation of mounting it to a T-TRAK module.
I decided the Kato-Woodland Scenics T-TRAK module kit was the best candidate, since fitting the bridge assembly to the module would be a trial and error process, and foam would be the easiest material to work with. I wound up having to cut more material off the AHM kit base to get everything to fit, but it all worked out in the end. The track is fastened to the foam base witha mix of silicone caulk and the foam adhesive supplied with the module kit.
I still need to pack scrap material around the bridge base to straighten everything out and keep it rigid.

Sunday, October 9, 2022

The AHM-Pola "Rolling Bridge"

I've been aware for some time that AHM issued a kit for a so-called "rolling bridge" in both HO and N, and since I've always liked drawbridges, I've always had it at the back of my mind to find one. However, I never ran into any at a swap meet, and partly because I wasn't aware of the exact name of the product, I could never locate one on eBay. It was only very recently that I discovered it was issued under the name "rolling bridge", and voila, I saw two on eBay at a moderate price.

I got the N version, because I figured I could adapt it to a T-TRAK style micro layout or diorama, whereas I don't have a good place to put the HO version on my main layout. Here's a copy of the art on the box:

The model version as produced by Pola, AHM, and Tyco has a brick machinery house and an additional short span that aren't on the prototype, which is located at Wingo, CA on the Northwestern Pacific. This is a line that I occasionally railfan, and I've always wanted to get photos of the prototype, but the area is hard to get to, and even harder in recent years, since the land now seems to be fenced off. However, this is on the NWP's connection to the California Northern and UP, and the bridge is still in use, although it's currently opened very seldom if at all.

Here's a photo of the prototype:

Here's the kit as I assembled it. Especially painted silver like the prototype, the detail really comes out nicely.
The length of the track on the bridge as I assembed it without the third span at the other side of the draw is 7-1/4 inches, which makes it a good candidate to install in a single-wide 12.20 inch T-TRAK module. However, with only one track, it won't meet T-TRAK standards, but I'll use it as a mocro layout component with the 3-2-2 Inglenook I discussed in my last post.

I decided not to make the model operate, as this is more complication than I want to deal with, and the prototype only opens on request with a lot of advance notice anyhow. As far as I can tell, the prototype only has manual operation.

Sunday, October 2, 2022

More Work With The N Micro

I'm feeling my way along with how to operate my 3-2-2 N scale Inglenook. I did a fair amount of N scale 30 and 40 years ago, but never much switching. I'm starting to think N scale cars need more weight for this, plus near-perfect trackwork. Building a layout from recycled track materials has its challenges, but two steps forward, one step back!
I've been able to unpack several N freight cars from long-term storage, refurbish them where needed, and put them into operation.
ATSF 48240 is a Micro Trains car from about 1980. There was no internet source of freight car photos at the time, but looking up photos of cars like this now shows Micro Trains got it pretty much right. I believe I added the COTS and U1 wheel stencils when the car was new.
N&W 12987 is actually a car of 1980 vintage, but I got it recently off eBay at a good price. I added Micro Trains roller bearing trucks with couplers.
When Conrail was new in 1976, Walthers brought out decals for some of the first cars with Conrail paint patches. This is a Micro Trains car that I painted Penn Central green, masked off areas to represent clean new paint patches, weathered the rest of the car, and then applied the Walthers decal patch lettering over the clean areas.
Southern 78197 is another Atlas car that I renumbered by covering the last three numbers on the factory paint with boxcar red patches, then added new numbers from a Micro Scale N Southern freight car set. The numbers matched pretty well. I also added the COTS stencils. These are the 1970s style consistent with the prototypes I saw at the time.

Sunday, September 25, 2022

Making A Micro Compatible With T-TRAK

I've had an N scale Inglenook micro layout in progress for quite a while. Recently I put it up on top of a bookshelf to work on it next to a T-TRAK module.
With it next to a T-TRAK module, I inevitably began to think about how things might be if I could connect the two together. I had already made a start by linking them to a Digitrax DCS-52 command station on the same DCC bus. Not only that, but all my pieces of layout have a single accessory address standard, so if they're linked together, they're contollable as a single layout no matter what.

The first question was that the Inglenook would need to be able to interface with the Kato Unitrack/Unijoiners on the T-TRAK modules. I did this by carving a rebate in the baseboard to let me add a short section of Unitrack to the tail track of the Inglenook at the same rail height as the rest of the flex track on it.

The next step was to shim up the Inglenook so it would be at the same height as T-TRAK modules. I also covered the gap in the baseboard around the short section of Unitrack with Sculptamold.
With the height established, it was just a press fit to connect them.
I had already designed both the Inglenook and my T-TRAK modules to be electrically compatible over a single DCC bus, so running a train from one to the other is no problem:
I'll expand the Inglenook as opportunity presents itself with T-TRAK compatibility in mind.