Sunday, December 22, 2024

Programming A Walthers Proto SW900 With ESU LokSound

I found a Walthers Proto Lehigh Valley SW900 with ESU LokSound at a good price, which I like a lot.
A number of manufacturers seem to be settling on LokSound. There are two areas of incompatibility between LokSound and other makers. Up to now, most had focused on F9 as engine start/mute. LokSound uses F8, which wouldn't be too much of a problem, except LokSound then adds a feature called "drive hold" for F9, which locks the loco into its current speed step setting but allows the user to change the apparent speed of the motor via the controller knob. But if you forget ESU engine start is F8 and press F9 when the loco is at speed step 0, this will keep the loco from moving until you remember that you goofed and press F9 again to release it.

The other feature I'm less enthusiastic about is the "prime mover delay" available on full-featured LokSound decoders (but not the economy LokSound decoders on Walthers Mainline locos). In additioon to normal momentum from CVs 3 and 4, this adds an additional acceleration delay while the sound of the prime mover spools up in the decoder.

Since I've never driven a prototype diesel, I don't know how much this additional throttle delay actually reflects the prototype. The main problem I see from a model perspective is that this makes a loco equipped with an ESU LokSound decoder incompatible for consisting with locos that have decoders from other manufacturers, since the ESU equipped loco won't accelerate as quickly as the others -- and that would even include Walthers Mainline locos with the economy LokSound decoder.

The way to fix this is simply to change CV 124 to 16 to eliminate the prime mover delay. Then the model will accelerate compatibly with other locos.

Sunday, December 15, 2024

Cosmetic Job On The Pola N250 Quarry

In my last post, I talked about the hstory of the Pola N250 quarry kit that eventually became the Model Power Blue Coal Depot, in which form I used it to represent a coal loader on an N scale module. Once I understood it had started out as a quarry, I recognized the detail I needed to either remove or de-emphasize to make it look more like a coal loader.
Viewed from this side, there are bins at the bottom level that represent grades of crushed stone that are apparently sold direct from the quarry and not shipped out by rail. These are a distraction and need to be minimized if this is going to be a coal loader.

On the next level up, there is a shed that apparently holds some sort of crushing and grading machinery. This might be sort of credible, so we'll keep it. There is also a cover for some sort of conveyor up to (or down from) the loader itself, maybe halfway credible. At least it's a conveyor

I said in my last post that I would try to use vegetation to distract from less credible features and focus on what looked most like a coal loader. Here's the result:

I filled the bins at the bottom with Woodland Scenics Foliage Clusters, held in with Elmer's Glue. I planted more of the Foliage Clusters around the rest of the base on this side and then planted some JTT trees to focus the view on the credible parts of the coal loader idea. Here are a few pictures that I used for inspiration:
It'll serve for now, there's just very little available in N that isn't a much larger facility. If I get inspired to scratch build something better, or if a new, better model comes along, I'll either swap it out on this module or build a new module. That's one advantage of doing things in small steps this way.

Sunday, December 8, 2024

The Model Power Blue Coal Depot

In my last post on the "found item" module, I mentioned the industry, which I referred to as a Pola coal mine kit from the 1960s. In the incarnation I found it, it had become a Model Power Blue Coal depot that I found on eBay. This appears to be out of production. An HO equivalent model seems to be easier to find.
As a result of discussion on a Facebook post, I located something like the histoy of this model. As I said in my post, it really doesn't seem much like a coal loader or tipple, either European or North American. In fact, it appears to have been issued originally as a quarry or ballast loader as the Pola N250:
The photo is from an eBay listing, as is the one below. As far as I can tell from this post, Pola was a German manufacturer of plastic building kits in at least HO and N. Some of them were, or could be interpreted as, North American prototypes and have been marketed at various times by companies like AHM, Model Power, and Walthers. The original owner of the Pola company passed away, and some of the European buiodings in the line were taken over by Faller, but apparently not the North American style buildings.

This particular quarry model seems to have taken some design features from the larger N245 coal mine model.

This is much more clearly North American, since it was based on a Model Railroader series, “How to build a coal mine”, by Jack Work in the October, November, and December 1959 issues.

My aim has been to simplify the N245 kit's profile and do as much as I can to distract from the extraneous features and make it look a bit more like an actual coal loader. Here's the current status:

I'm going to continue covering the extraneous parts with vegetation. The ivy is made up of Elmer's glue brushed onto the model full strength, covered with Woodland Scenics fine turf pressed into the glue.

Sunday, December 1, 2024

"Found Item" Module

While I was working to convert my Inglenook micro layout to Kato Unitrack amd Kato Mini Diorama/Pocket Size Module standards, which I covered in this post, I beganm to think abou8t other small module possibilities. I found am irrwegular piece of 5/8" plywood about 8" x 20" in my garage and decided to turn it into a module that could be connected to the Inglenook or any Kato Mini Dorama/Pocket Size module that follows the 25 mm deck height and Unijoiner standard. Here it is, just finishing basic electrical, trackwork, and connectivity tests:
The Kato switch is controlled by DCC, thus the terminal strip in the corner. There is no clearance for it or a switch decoder under the board. I'll have to figure out a way to hide it. But the point is that as with T-TRAK, the DCC bus can go from module to module via the Unijoiners. This expands the possibilities for lighting and control.

The industry on the sidinmg is a Pola coal loader kit from the 1960s. I'm not sure if it looks like any coal loader in the real world, but little else that size is available in N, and it was fairly inexpensive on eBay. I plan to bury it partly in a hillside and cover much of it with ivy or kudzu.

The main line at the front can connect with other Pocket Size/Kato Mini Diorama modules at either end, or with the Inglenook at the near end. Scenery is the net step.

Sunday, November 24, 2024

The New Atlas N Scale FA-1

Atlas has a new N scale Alco FA-1 and FB-1 that are reworked versions of Life Like-Walthers models. For entry-level models, these have a couple of new features. While they're available with sound, I got DC versions intending to install DCC-only decoders.

One feature is a Next18 DCC socket. This is mounted on a plastic motherboard above the motor toward the rear of the unit, where the Next18 socket points downward. I used a Digitrax DN167n18 decoder.

The best way to get to this is to loosen the rear nut and screw that hold the two halves of the chassis together enough to lift the rear of the plastic motherboard up, remove the Next18 dummy plug, and insert the Next18 decoder. There is barely enough room for trhe decoder to fit between the socket and the chassis, but it does fit.

Once I appllied power to the loco, I noticed there is an extra set of LEDs at the front 9of the chassis. These will allow the number boards to be lit and controlled separately from the headlight. The headlight is controlled via the usual F0:

With a DCC-only Next18 decoder, the number boards can be lit with F1:
I don't know what function controls this on a sound-equipped loco.

I don;t believe these locos have flywheels, or if they do, there is very little momentum effect. However, setting CV 3 acceleration momentum to 2 and CV 4 deceleration momentum to 2 will mimic a flywheel effect. The loco has a 5-pole skew-wound armature and operates very slowly and smoothly.

Unfortunately, as seems to be the case with recent Atlas N locos, there's no documentation in the box. Users need to figure out shell removal and decoder install for themselves and intuit the headlight-number board functionss. (The shell comes off by spreading the sides outward with small screwdrivers or toothpicks.)

An exploded diagram of the loco showing the location of the Next18 socket would have been very helpful; it isn't immediately clear.

Sunday, November 17, 2024

Still Rethinking My Inglenook

In 2022, I began playing around with an N scale micro layout using the traditional Inglenook track plan:
The original Inglenook idea, which has apparently existed since the 1930s, is a self-contained layout that's used to run switching puzzles. Over time, as I kept playing around with the idea, I began to think about it in the context of newer modular ideas like T-TRAK. I eventually shimmed the layout up enough to match the T-TRAK baseboard height and spliced a Unitrack interface into the Inglenook tail track so that the Inglenook could be interfaced with a T-TRAK module.
But after that, I became aware of newer N scale module systems that also use the Unitrack connection, Kato Mini Diorama modules and the compatible Pocket Size Modules, which I've also talked about here. I decided these would be a better choice to interface with the Inglenook and re-shimmed the deck height to about 25 mm to match the newer types.
But then it occurred to me that there was no reason not to add another Unitrack interface at the other end of the long straight track at the base of the layout, which would allow other modules to be connected at either end. But if I did this, I might as well go ahead and replace the yard tracks with Unitrack. The original track was what I had on hand, salvaged from an old N layout, but being re-used, it was uneven and unreliable. Might as well just replace it.

Below is the current status:

When I lowered the deck height to 25 mm, there was no longer clearance to mount a Digitrax DS52 switch decoder underneath the baseboard, so it's been brought up top and will be covered up with a structure. I decided to keep the diagonal track and the dummny crossing. This track is wired as a Digitrax programming track. The next task is wiring up the Unitrack switches to the DS52 and then finishing tracklaying.

Sunday, November 10, 2024

Hybrid Module

This module started out as a half-depth, single-wide T-TRAK module. I'd seen here and there that people were successfully making T-TRAK modules from corrugated cardboard, and I decided to experiment with this. But after I started, I learned about Pocket Size Modules, and I realized that this standard, which involves single track, was probably a better choice. I trimmed down the base so that the deck is 25 mm (roughly 1") high, so it will link with Pocket Size or Micro Diorama N modules.
I generally followed current practice in building up the scenery with a lattice of corrugated cardboard strips. I used tunnel portals I had on hand, as well as a piece of Woodland Scenics Ready Rocks. Instead of plaster cloth, I used Woodland Scenics Shaper Sheet.
I added a preliminary layer of Sculptamold.
Then, inspired by videos of people building Micro Diorama Modules, I decided to use modeling clay to build up the final landforms. I used Crayola Model Magic, which is fairly inexpensive and available at Hobbyh Lobby or Michaels.
This cracked as it dried. I filled the cracks in with more modeling clay.
The ground cover is ordinary dirt held in place with Elmer's Glue and sprayed with water from a garden sprayer. I followed this up with Woodland Scenics Burnt Grass fine turf.
I still have to add trees and foliage.

Sunday, November 3, 2024

The Pabco Water Tank

A little over a month ago, I posted on my renewewd project to model the Pabco Paper plant in Vernon, CA, this time as a series of pocket size modules (the Facebook group for this idea is here). The next step would be to build a module that incorporates the water tank:
I found a satellite view of the segment of the plant I'm modeling:
So this module will represent a raised concrete platform with the water tank off center. The photos show the rest of the platform is occupied by what look like electrical transformers. This is how it's come out so far:
Aftter looking at both the Walthers and Woodland Scenics N water tanks, I decided the Woodland Scenics was closest. I sprayed it with Tru Color Grime, which seems to be a close cousin of the old Floquil Grimy Black. I also found some 3D printed N scale transformers on eBay. I'm going to continue to add small details as I run across them. Below is how the assembled modules look now:

Sunday, October 13, 2024

Back To My Inglenook Test Bed

It looks like I first documented an Inglenook style micro layout here back in March, 2021. This has been through many changes as I've continued to pursue an N sideline. About a year ago, I shimmed it up to match T-TRAK module height and installed a Kato Unijoiner interface to allow me to run equipment from T-TRAK coompatible modules onto it.
However, I never added much scenery; in this case, just a Custom Z scales printed card building kit.
Over the past week, after I discovered micro diorama modules, I lowered the shim so I could use it with these. The scenery on these intrigued me enough that I started to add scenery to one end of the Inglenook:
Although the scenery on the micro diorama modules was modeling clay, I used some leftover Sculptamold mixed with texture paint to build up a small hill. I had a box of Woodland Scenics Ready Rock Surface Rocks, and I used a good-size one to add some interest to the hill:
I covered the area of the hill that wasn't covered by the Ready Rock with Elmer's Glue. Then I sprinkled on some generic dirt I picked up on a railfan trip, followed by Woodland Scenics Burnt Grass extra fine turf, and then I used a garden sprayer to soak everything with water.
I still need to add trees and brush.

I posted briefly about this on the Micro Diorama Modules Facrbook group. Apparently the idea of connecting a micro diorama module to an Inglenook via a Unijoiner interface was something they couldn't handle -- they deleted the post and gave me a Facebook warning. I decided this was too close to a dysfunctional HOA and left the group -- I'm sure they were happy to see me go.

Sunday, October 6, 2024

Programming An Atlas Gold N SP SD9E

Atlas has been re-releasing older N models with ESU LokSound 5 in its Gold series. ESU LokSound is a good product, but ESU's own documentation is hard to work with, while Atlas provides no documentation at all with this loco, ESU or otherwise. This is different from Walthers, which at least provides basic documentation for rhe ESU CVs in its Mainline and Proto sound equipped locos.
The detail on the Atlas body is generic. The model is well painted for the late SP gray and scarlet scheme, but the number, 4355, makes it an SD9E. These were rebuilt by SP beginning in the mid-1970s, with small details, including air filters, revised light packages, and a hump in the hood behind the cab, that varied depending on when the loco came out of the shop as well as later modifications. Because the Atlas model is older, "generic" tooling, it doesn't have any specific SD9E details other than the number and the assignment to Eugene stenciled on the cab.

This is acceptable given the model's price, which would be considerably higfher if, like Broadway Limited or Scale Trains, it had road-specific details. In this, it's comparable to the old HO Athearn bluebox SD9, which despite its wide hood continues to be an acceptable layout-quality model.

ESU and Atlas provide the loco with certain CVs preset that diverge from other manufacturers. In particular, the engine startup-shutdown is F8, unlike the F9 other manufacturers use. F9, on the other hand, is "drive hold", a feature unique to ESU. If you press F9 by mistake expecting to startup the sound, this can leave the loco stuck in not moving until you think to press F9 again, which is confusing.

ESU also sets default values to CV3 and CV4, acceleration and deceleration, unlike other suppliers. This can make MUing other manufacturers' locos difficult, and as a longtime DC user bvefore I went to DCC, I like the feel of immediate throttle response. I set CV3 and CV4 to 0.

ESU has another unique feature, prime mover delay, which delays acceleration while the diesel engine sound spools up. Again, this makes it difficult to MU an ESU equipped loco with one from other DCC suppliers, and I find the delay in throttle reponse annoying. To get rid of this, I set CV 124 to 16.

Finally, I tested the horn using F2. It is factory set for a single-tone blat. Atlas doesn't provide documentation for other options, but browsing the web, I found that if you e-mail support, they can send you a list of their CVs for the SD7/9 model. I did this and got a list within an hour or so. From their documentatoin:

CV163=0 Leslie A-125
CV163=1 Leslie A-200
CV163=2 Leslie S-2M
CV163=3 Leslie S-3K
CV163=4 Leslie S-3L
CV163=5 Leslie S-5T
CV163=6 Nathan M3RT1
CV163=7 Nathan M3H
CV163=8 Nathan M5
CV163=9 Nathan P5 (Old Cast)
CV163=10 Nathan P5R24
CV163=11 Nathan P3
CV163=12 Nathan P3-R4
CV163=13 Nathan P5A
CV163=14 Wabco E-2
SP used Nathan P3s, so I set CV163=11. This worked fine, and the P3 sound is great. Unfortunately, the "generic" horn detail on the body is maybe a Wabco E-2 "blat" horn. There used to be SP style aftermarket N details available, but I think they're much harder to find these days.

Sunday, September 29, 2024

Back To My Low-Relief Pabco Paper Building

Back in 2021, I posted on my efforts to make something work with a low-relief, reduced scale, selectively-compressed representation of the enromous Pabco Paper facility in Vernon, CA:
The effort in that post was my second; I had originally intended it to go against a backdrop on my HO layout, but I wound up not liking it there. Then I tried it on an N scale switching layout, thinking its reduced scale made it closer to N anyhow, but I didan't like it there, either. Eventually I deconstructed it into separate buildings, still not sure of where to go with it, and I was close to throwing everything out.

Then a few weeks ago, I discovered Kato mini diorama modules and the related and compatible pocket size modules, and after a little cogitation, I decided to turn the deconsctructed buildings into individual double-width pocket size modules, which are compatible with Kato mini diorama modules.
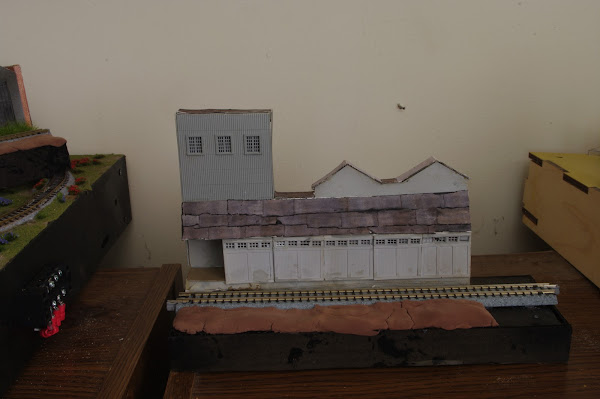
What I like about this approach, in addition to the reduced size, which seems closer to N scale, is that the length of the scene is adjustable, and the whole layout configuration that it goes with is also completely adjustable. The single track on the modules can be either a main line or a siding.

Also, one issue on which I had been stumped was how to incorporate the water tower that's between the two buildings on the prototype:

I didn't think a water tower cut in half was going to work as a background flat. But now I realized that I can simply build a 4-7/8" wide pocket size module that's deeper than usual and then just mount the wster tower on it and hook it up between the other buildings or not as I please.

Monday, September 23, 2024

A Few Mini Diorama Modules

I've started building some mini diorama modules to see how the idea works out. The first thing I needed to do was figure out how to add a power feed, because I have several different controllers, both DC and DCC. Because the concept is based on Kato architecture, most people seem to use Kato track feeders connected to the Kato power pack with standard Kato plugs. However, I don't have a Kato power pack and prefer to use standard terminal barrier blocks with spade terminal connectors that can be used with any conroller.

Here is a Klawndyke strtaight module modified to incorporate a 2-position terminal block.

The straight module in the photos below is this terminal module with scenery added.
Below is a curved module with scenery to represent an oil field. It uses inexpensive 3D printed details from eBay.
A commenter to last week's post said that modules that have scenery but leave the module base visible create a distraction. I did these modules before that comment, and my view is that it's just easier to put the clay all the way down to the base. I sort of like the hidden base better.

Sunday, September 15, 2024

N Scale Mini Diorama Modules

Over the past couple of weeks, I discovered a new type of N scale module. These were originated by Kato and marketed as school classroom projects, but their appeal has extended into the model rail hobby. Here's an example of a finished module by Australian modeler Maureen Kathage from a post on the Mini Diorama Model Railroading Facebook group (her photo).
Although they're quite a bit smaller than T-TRAK modules, they're very similar in principle, since they're meant to be set up on tables and are dimensioned to use Kato N Unitrack, with Kato Unijoiners forming both the mechanical and electrical connection between modules.

At this point, these are sold as kits for straight or curved modules. The straights are meant for Kato 20-020 4-7/8" straight sections, while the curves are meant for Kato 20-172 7" curve sections. These are sharp -- the equivalent of less than 15" in HO -- but N scale GP style locos and 50-foot boxcars will run on them.

Module kits are available on eBay from US and Japan sources, as well as from Amazon, and apparently from a Kato US web site. However, they can be pretty expensive from some sources. The least expensive are US-made clones from Klawndyke's. I've found that these are robust, high-quality products, and he fills orders promptly.

Kato USA has a video on assembling their module kit:

And another one on adding scenery to a completed module kit:
There are other videos like this one that show how to use relatively inexpensive scenery materials from Michaels or Hobby Lobby to finish a basic module kit.
The use of materials like modeling clay makes these modules a somewhat "arty" project. Another is the shape of the modules, which encourages the artistic quality of asymmetry.

There's also the similarity of the N scale mini diorama modules to the bonsai hobby, in which a plant is kept in a dwarf form and pruned into an artistic shape. In modules as small as these, there's a need to evoke the sense of something larger with artistic techniques.

This strrikes me as a fascinating recent development in the hobby, which I want to follow up.

Sunday, August 25, 2024

Another Ertl Gondola

N&W 17249 is another Ertl Collectibles gon. I really like the paint on these cars. I did the usual of replacing the plastic knuckle couplers with Kadee 148s and the plastic wheels with Kadee 33 inch flat back wheels.
I decided to put a Rusty Rails gondola junk load in this one. These are resin castings that come unpainted. I'm still working on this one. I sprayed it with a can of Tru Color Flat Aged Rust and then went over it with Tamiya Brown Panel Liner. I will then touch up separate details with a brush.

eally like the sharp, opaque lettering on the Ertl cars.

Sunday, August 18, 2024

Working Through My Erie Lackawanna Backlog

In recent months I've been working my way through a backlog of Erie Lackawanna locomotives that I got in the 1990s that still need DCC. A number are Stewart/Kato locos. These were among the first HO F unit models that moved beyond the standard set by the Athearn/Globe tooling of the early 1950s, with a more accurate nose and roof curve, finer overall detail, and wider variations in headlight and roof options. They still neederd a lot of work, especilly handrails and grab irons, and the coupler mounts didn't really allow for prototypical spacing between units.

I spent some formative years in Chatham, NJ, on the Lackawanna's Morris & Essex Division. My family moved to the Washington, DC area in 1963, not long after the EL merger, and I was homesick for New Jersey for a long time afterward, thus I have a lot of EL models.

EL 7062 is an F3B, former Erie 706B. On the EL, these originally worked in sets of both ex-Erie and ex-Lackawanna EMD F units and ex-Erie Alco FAs coupled together; in later years, they could be found scattered more widely in consists. In my catch-up process, this one is low hanging fruit, since in my layout's original home, I had already converted it with the Kadee 450 set for Kato/Stewart diesels. Thus all it will need is a Digitrax DH165K0 decoder with no need for LEDs, since it's a B unit.

I have a couple other Stewart/Kato EL and DL&W units that will need more work. Although in the past, I upgraded a number of the Stewart bodies with Detail Associates detail sets for handrails and lift rings, these are no longer available, and I really don't want to do all that work any longer anyhow.

Sunday, August 11, 2024

Updated Ulrich GS Gondola

Ulrich HO kits were high-end models in the 1950s, expensive, hard to find, and in comparison to Athearn, hard to build. They were out of my league at the time. Since then, I've run across a few at swap meets. This Utah Coal Route car was one of several I picked up at a meet and have been converting to contemporary operating standards.

This is how it looked when I brought it home from the swap. The pieces were all there, but:

One coupler was completely missing, and nothing was holding the other in place.
I tossed the one old coupler.
I decided to mill out the ends of the underframes of all three GS gons that I found using the cutting disk in my Dremel to let me install Kadee 148s:
Then I installed the Kadee 148 boxes with CA. When this dried, I used the mounting holes in the boxes as guides to drill #50 and tap 2-56 for mounting screws. Below is the finished car with paint touched up. I used plastic trucks from the junk box with Kadee 33 inch wheels. A 70-year-old model, it can now run with DCC and sound equipped locos and good-quality made-in-China freight cars.
According to Don Strack's Utah Rails site, the Utah Coal Route had 2,000 cars of a somewhat different design from the Ulrich model. "The Utah Coal Route name was in reality used only on these 2,000 cars and was a marketing scheme for coal mined in Utah and shipped to destinations on the Union Pacific."

These cars lasted to about 1960 and were replaced by hoppers lettered for the Utah Railway.