Sunday, December 27, 2020

The Life Like/AHM PRR A3 0-4-0

One of my early locos I started the hobby with after college was the Life Like/AHM PRR A3 0-4-0. This site says Life-Like brought the loco out in 1972 for a $10 retail price, which is about the time I got mine. It was made by Mehano in then-Yugoslovia. AHM marketed the model later in the 1970s for a higher price.

The model is based on the Pennsylvania Railroad A3 0-4-0, which dated from 1895. I detailed the one I got in 1972 and painted it for PRR. It was the main power on a small shelf layout I had in my first apartment, and I used it for several years. It's still packed away somewhere.

I would say that, even for the early 1970s, it was pretty marginal, though for $10 even then, it was at least worth the money. It had a noisy 3-pole mtor that was mostly plastic, and power pickup was only from the four drivers. I don't seem to have minded too much that I had to nudge it frequently to get over my switching layout when it stalled. It really isn't a serious option 50 years later -- it wouldn't be a bad choice for a new model designed from the ground up with pickup on drivers and tender wheels, 3-point suspension, and DCC control with keep-alive capacitor, but the 1972 model ain't that locomotive.

These turn up on eBay now and then, sometimes reasonably priced and sometimes not. I wouldn't buy one to operate at this stage, but if I see one at a good price, I'll pick it up for use in a dead line of scrap locos for layout detail. Not long ago I saw one in the $15 range, and the prior owner had removed the motor. (I'm not surprised, though mine lasted over several active years.) Here it is on my layout:

I intend to remove the lettering and paint it in variouis shades of rust and weathered paint. But since the previous owner removed the motor, the loco will coast, so I replaced the rear coupler on the tender to see how easy it would be to have another loco hostle it around.
Well, the Badhmann Porter 0-6-0T can pull it, but it has a lot more trouble pushing it, so I guess if I want to hostle it, I'll need something bigger.

Sunday, December 20, 2020

More Building Flats

I've been working on a large view block made of building flats to try to bring some order out of chaos on the West Coast peninsula of my layout, again inspired by George Sellios, I put together this kitbash of Kingmill, Trackside Flats, and scratchbuilt building flats. As usual, I back up the flats with a 3-dimensional rear extension about two inches deep so they'll stand alone without needing to be placed against a wall. Now I've begun to assemble them into larger groups glued together with Elmer's Glue that can be moved around if needed.
The layout is in a semi-finsished basement. The view block does nothing to hide the HVAC ducts if you look upward, but it does hide less somplete areas of the layout The items in the foreground are still pretty disorganized, and you can see both European and US equipment. I hope to get this better sorted out in the coming year. Still, I follow several German YouTubers who mix European and US equipment as well.

Here is the Gold Medal Flour building before I got things better figured out into a view block. The billboard has also since been incorporated into another group of low-relief buildings.

This was inspired by a building on the Franklin & South Manchester. I took the idea, but I followed it only loosely.
I think Sellios and I started with the same thing, a set of ghost sign images on a forum. I printed them out on ordinary paper and glued them to a basic shape made from foamcore. I also printed the roof fom images of roll roofing on a texture site. I also got images to make up the ends from texture sites as well. Ghost sign and texture sites are a great source of model ideas and inexpensive raw materials.

Sunday, December 13, 2020

Athearn/Roundhouse British Columbia Boxcar

I recently discovered an Athearn/Roundhouse BC Rail boxcar in the late scheme at MB Klein and ordered one. Here it is with wheels and trucks painted, new couplers, and graffiti:
It came with post-2010 conspicuity stripes. In the areas where the new graffiti covered the stripes, I replaced them with new stripes from Smokebox Graphics.

I was curiouis to see how close the model was to any prototype. I found that I'd shot two BCOL cars in the 100300 series at various times:

However, I don't have anyu shots from the 100400 series that this car is in. A check of the 100400 series on rrpicturarchives.net shows that these cars are smooth sided, unlike the 100300s, but they have one plug door and one sliding door.

Then I had a flashbvack. The tooling on these models is Roundhouse straight from the mid 1970s -- I did a couple in SP at that time when they were still Roundhouse kits. However, the factory paint at that time was so poor that I always just painted undecorated cars myself.

Thee cars sorta-kinda represented SP cars that I saw pretty frequently at that time. I think they hauled wine from Napa-Sonoma.
So this is quite interesting -- 45 year old tooling, with a paint job much improved from what was available in the mid 1970s. The only changes to the 1970s model are the brakewheel, improved trucks, metal wheels, brake parts, and the McHenry couplers (which still have to be swapped out for Kadees).

Although the car is just an approximation, I think it still works at normal layout distance, especially with the improved factory paint, along with graffiti.

Sunday, December 6, 2020

The Bachmann Plus B23-7

I was going through my "purgatory box" of vintage models and ran across this old Bachmann B23-7. I was hoping I might be able to convert it to DCC. The HO Trains Resource website has a page on this model and says it was released in 1992 for $39.95. I got a few of these at the time, though I possibly didn't spend that much for them. (By contrast, the Atlas HO B23-7 dates only from 2005, so the Bachmanns were the only game in town at the time.)

I did a fair amount of work on this to bring it up to snuff. I added Kadees, MU hoses, plows, grab irons, a brass horn, fuel filters, bell, and a radio antenna. I also blackened the vents. From a distance, this is still hard to tell from the Atlas model, though the handrails and fuel tank are pretty crude.

This model also came in the period where Bachmann was beginning to upgrade its line. It had a metal frame, 8-wheel pickup, and a motor with flywheels mounted lengthwise driving worms on both trucks through a univerdal shaft. On DC, it ran comparably to Athearn bluebox.

But on my most recent attempt to convert one to DCC, I ran into a problem I had with an earlier one of these -- you haave to remove the motor from the frame to insulate the bottom brush for DCC wiring. As far as I can tell, the motor is assembled directly into the frame, and twice in a row now, I've discovered that you just can't remove the motor. In the process of trying to tease it out of the frame in one piece, it disintegrates into scraps of plastic.

I wound up removing the motor and the worm shafts from the trucks and turned this one into a dummy, since I'd put work into it.

Bachmann issued a B23-7 in its Spectrum line later in the 1990s. (My memory is that I saw Bachmann Spectrum HO diesels in stores about 1998.) This was a better quality loco with nickel silver plated wheels, and the motor was easier to remove. It was possible to convert it to DCC, which I've done. I believe the Spectrum version was available only in Missouri Paciic and Burlington Northern.

Sunday, November 29, 2020

Installing The Bachmann Interlocking Tower

I received the Badhmann Lackawanna interlocking tower I ordered. The first thing I did was repaint the tiles on the roof a terra cotta green, which amny of the prototypes seemed to be:
Here's a prototype photo I found on the web that gives some idea of the roof color, as well as the actual concrete color:
It looks like I'm going to have to find some Aged Concrete paint and see what I can do to dry-bruh it to enhance the color.

In this post a few eeeks ago, I talked about prepping a scenery area in West Zenith for placing the new concrete interlocking tower.

Once I'd installed it, I tried out a couple of new photo angles on the layout that would feature it:

I'd wound up leveling half of a small hill, which was a blah scenic area with no particular interest to it. By creating a new point of interest in the tower, I think I've perked up a new part of the layout. I have to level up the tower, dirt it in, and reinstall trees and ground cover in the overall area.

Sunday, November 22, 2020

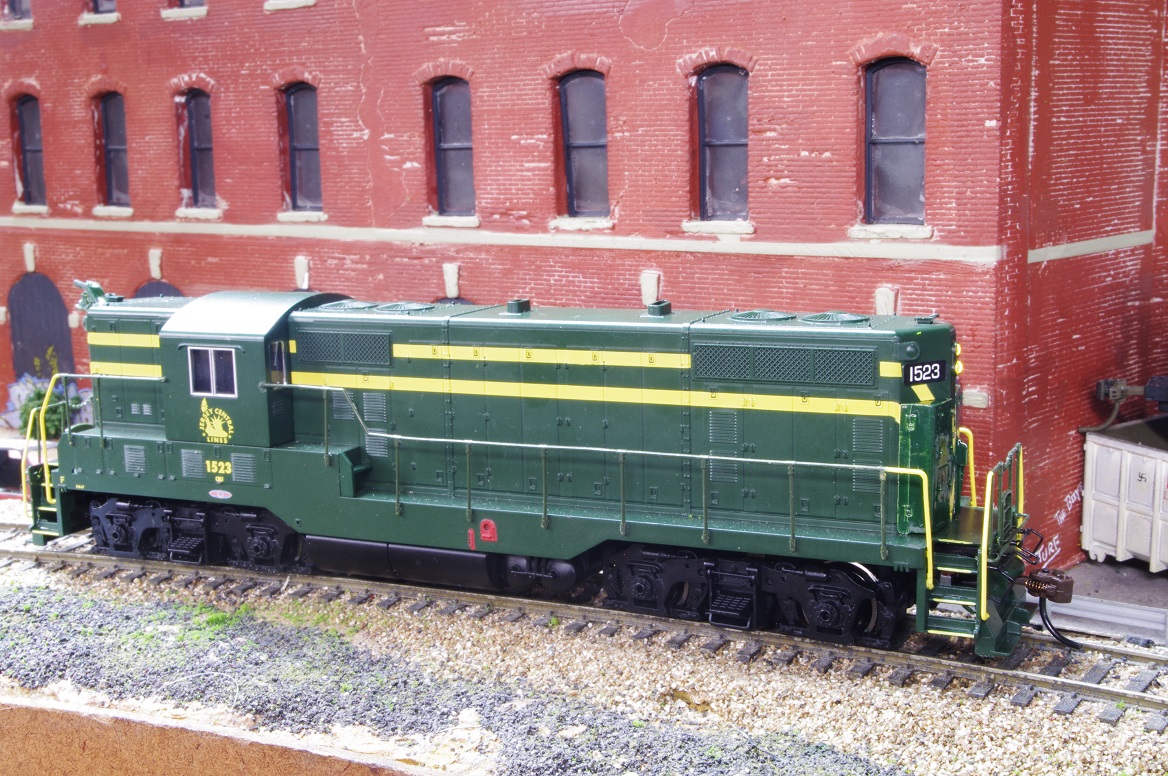
Looking At The Bachmann Jersey Central GP7

I've known for several years that Bachmann has a version of their GP7 in Jersey Central paint. This is a loco from my childhood, as my grandparents lived about a block from the New Your and Long Branch in North Asbury Park, and when we visited, it was just a short walk to railfan trains at the station there.

But not long ago, I noticed that TrainWorld was clearing out its Bachmann Jersey Central GP7s, and I'd better pick one up, especially at the clearance price. The reason I'd hesitated up to now was that there's one important difference between the prototype and the model, and I wasn't sure if I wanted to deal with it.

The Jersey Central GP7s all had long hood extensions that housed electric generators for train lightibg:

Whereas the Bachmann model from the box just follows standard EMD GP7 features:
But leaving that discrepancy aside, I think Bachmann did a very good job with the paint and lettering. For innstance, I thought at first that the number beneath Miss Liberty on the cab side was too small, but I went checking photos on the web and discovered Bachmann had noticed something important: given the Jersey Central's standard lettering placement, the GP7 cabside numbers went between two louvers on the battery box doors. There was too little space there to fit standard numbers.

It looks like some GP7s got alightly larger numbers on plates welded to the louvers, while others may have had numbers the small Bachmann size.

For the train lighting generator, Custom Finishing makes part 213 for this in HO. You just clean up the castings, paint them, and super glue them to the long hood end:

The problem is what color matches the Jersey Central green (I think they called it Sea Foam Green). I've read that Chicago & North Western green is close, and I may have tried this in the past and liked it. However, I'm out of CNW green, and we're no longer in an age where you can just run out to the train store and pick up a bottle. I scrounged in the paint I had and discovered I had some Scalecoat Southern Railway green, which turns out to be at least an OK match:

Now I just need to scrounge a decal with the deep yellow "V" to apply to the end. I think I have an old Walthers set I can use. At that point, minimal weathering will cover any slight difference between the green shades. I also added a Custom Finishing 246 GP7 high hood bell to the short hood:
I notice that the Bachmann Jersey Central green is a good match for the green on the Atlas Jersey Central Train Master:

Sunday, November 15, 2020

And Even More Scenery Work

I made a trip to the train store this past week and came back with a big grocery-size shopping bag full of Woodland Scenics items. The result is that the hardshell on the big promontory that surrounds the sewer pipes is about 90% covered, with work underway on rock molds and dirt surface, with vegetation starting to cover things.

I completed coloring the plaster rock castings on the East Coast scenery-based side of the pomontory. The part of the hardshell that isn't covered by rockwork has been fully covered with Sculptamold mixed with cheap acrylics.

The next step will be to add extensive trees and clump foliage to this general area, covering a fair amount of the castings as well.

The photo below shows clump foliage being inserted into the rock crevices in the Woodland Scenics Ready Rocks that have been installed. A great deal more remains to be done.

The photo below shows the remaining plaster cloth hard shell that hasn't yet been covered with Sculptamold or Ready Rocks. This will be the last phase of the project to scenic the sewer pipe promontory.
I added a piece of Masonite to serve as a base for the Bachmann Lackawanna tower that will be installed at West Zenith. This is on its way.
The next step will be to finish off the open9ng with plaster cloth and add a retaining wall to the cut-off part of the hillside.