Tuesday, October 31, 2017

Disintermediation Pains

A while ago, my wife and I got a phone message that, after we followed up, turned out to be a scam. A caller claimed to be with the Los Angeles County Sheriff, and he said I'd missed a jury duty summons and was going to have to turn up at the courthouse to pay a fine. We called back, although we were suspicious. The guy was a bad enough actor that I finally asked if there was some way I could verify he was actually a deputy -- at that point, he hung up the phone. I got on the web and found out, right down to the name he was using, that this was a scam. I guess the guy figured once I wanted to verify, there was no use wasting any more of his time.

So I was thinking about my e-mail exchange with David Popp. As I say, I'd e-mailed him and the general MR letters address several times complaining about how I didn't see what I was getting for my money with Model Railroader Video Plus. (1) Charlie Conway, a contributor, had gotten into the habit of turning the camera over to his 15-year-old daughter, who would wobble the camera, drop it, or whatever, giggling. Once or twice, well, OK, but this wasn't cute after half dozen times. I asked why we paid for this on MRVP when we could get it for free on YouTube. Nobody answered, but Conway's daughter stopped appearing on his pieces.

(2) I complained when they started putting features that we thought we were paying for into the "free video" category that anyone could see. Popp answered this time, saying they decided this would be a good way to bring in new subscribers. He said they used to open the whole site up for a weekend once or twice a year to encourage people to subscribe, but that didn't work. He gave me his office e-mail and said to write him directly with any other concerns, because they cared what every subscriber thought. Well, OK.

(3) On Monday I sent the e-mail I quoted yesterday and got back his reply, which I also printed. Interestingly, I had raised again the question of why we should pay for stuff we can get for free on YouTube. This time, he didn't say anything about caring what every subscriber thinks -- he just said straight out that if I didn't want to pay for free stuff, I should cancel my sub, and this struck me as a very logical suggestion. Not much different from the scammer who decided not to waste his time scamming me if I was asking the wrong questions, the way I see it.

I'm beginning to think MR and MRVP are beginning to face a real problem that you can get a lot of stuff on the web for free, and you don't need an editor -- especially one who doesn't want to work too hard, apparently -- to put it together for you. I'd pay a few bucks a month for exclusive, quality professional videos, but MRVP wasn't providing that product. I can subscribe to dozens of good model railroad video channels on YouTube for free, and they'll often be as good as anything on MRVP.

It's called disintermediation. I don't give MRVP a whole lot more time.

Monday, October 30, 2017

I Just Canceled My Subscription To Model Railroader Video Plus

I sent this e-mail to David Popp. I've complained to him before about the amount of non-exclusive content on the site. I pay for a membership, but an awful lot of videos there are free to all comers.
Well, I note you’re adding Kathy Millatt to MRVP. Leaving all else aside, I’m back to wondering why we would want to pay for material that we can find for free on YouTube, as MRVP itself acknowledges. One of my consistent concerns about MRVP is that a fair proportion of the material that paying customers see is given away to all comers. I just checked her YouTube channel, and there are 135 videos available on it for free, plus her blog, plus her posts on free forums. I note that she appears to have free videos available on the very subject she discusses on MRVP, eBay trees and how to use them.

However, I really hadn’t looked at her YouTube channel much until she appeared on MRVP, and I went to see what I might have been missing. My own reaction is that her focus is overspecialized – there’s a video on how to model pond scum, another on how to model oil slicks. But when I went to her tour of her own layout, I found it disappointing – very little is finished, and it doesn’t look like she runs anything at all.

I’m increasingly concerned that we aren’t getting what we’re paying for, too few exclusive videos for subscribers – in fact, the overall numbers lately seem to be falling off.

I’m beginning to re-evaluate whether I should keep subscribing to MRVP.

He replied,
Yes, we found Kathy while we were looking around Youtube earlier this year for up-and-coming video presenters that we could pull into MR Video Plus. She does have an extensive background of modeling work, not only in model railroading, but also in the world of plastic kit modeling. I visited her New Haven layout last month, and she has made the 12 x 12 attic in her UK home work very well for a double-decked layout. The plan for her series is to work on the scenery for a section of her layout using a variety of techniques. We are very pleased to have her as part of the MR Video Plus team.

I am sorry that you are disappoint with our MR Video Plus product. I will be the first to admit that we do what we think is best for showing techniques and entertaining our viewers, and it is impossible to please everyone. As for frequency of content, as always, we post a minimum of 3 new videos per week. That hasn’t changed since the product’s launch 4.5 years ago.

Only you know how you the value you feel you get from our service. There will always be free video available on YouTube and similar sites, and there is nothing any of us here can do about that. As you can imagine, we cannot make videos without subscribers, but we are not forcing anyone to stay with MRVP either if they feel they can get the information and entertainment they are looking for elsewhere.

I do thank you for trying MR Video Plus, and I wish you well in your endeavors.

So with a little effort, I saved my credit card that bit of monthly billing. I guess I could get some detail parts or something with the money that I would find more useful.

Sunday, October 29, 2017

Books For The Penn Central And Conrail Fan

At some point in the late 1970s, I found a worthwhile book, A Sampling Of Penn Central, at a swap meet. It has long been one of my favorites. I got it then for some nominal amount, certainly no more than five or ten bucks. You can find an excerpt at the link on Google books. I recommend the excerpt, because in trying to find bibliographic info, I discovered on Amazon that even though it was reissued in 2000 by the University of Indiana Press, copies now go for about $350. I have some books like this in my library, and at some point I will need to set them aside so they're properly valued in my estate!

Anyhow, I always wanted to get the next book from this author, Jeremy Taylor, Conrail Commodities. I missed it when it first came out, and by the time Amazon came around and I could look it up, it was going for a premium price like the Penn Central book. My memory is in the $200 range. When I was visiting the Western Railway Museum a couple weeks ago, though, I found a copy for $30 in its used bookstore. I grabbed it in a hurry! I checked Amazon later that day to see how much of a bargain I'd come up with -- on that day, copies were going from $35 to over $600, so who knows. I checked again today, and it was going for $45.

From the Penn Central book, I got the impression that Taylor was some sort of railroad insider, possibly a PC employee. Conrail Commodities gives more biographical information. He graduated from Cornell in 1949, Cornell Law School in 1952. A search in Ancestry.com gives a birthdate of 1931. After leaving school, he worked for the New York Central throughout the 1950s and 60s, leaving Penn Central in 1969 as its New Haven reginal manager. This strongly suggests he was an Alfred Perlman protege, and he pulled the plug at PC around the time Perlman did. He then became Vice President -- Operations at the Long Island Rail Road, retiring in 1977 (at the age of 46!).

Interestingly, he's the same age as my uncle, Harry Bruce, who worked for Perlman as Vice President -- Marketing at Western Pacific. I don't know if he and Taylor knew each other at all; I'll have to check if I have a chance. My impression is that everyone at that level in the industry knew each other. My uncle, by the way, has always insisted that those who call Perlman "Al Perlman" never knew the man -- he was "Mr Perlman" to everyone. I heard an anecdote about Perlman once that my uncle refuses to believe, but it was from someone who also knew him. I'll tell it one day here, maybe.

After leaving PC, Taylor began writing a few railroad books, using the contacts he had in the industry to get permission to be on properties and find inside information. The books are mostly in big photo-with-extended-caption format, but the captions are extremely through and full of insider information. Searching the web, I see that after Conrail Commodities, he wrote books on Powder River Basin coal trains and the Clinchfield. Luckily, these are reasonably priced, and I've sent for the one on the Clinchfield, one of my favorites.

In you find either A Sampling of Penn Central or Conrail Commodities at a used book sale by someone who absent-mindedly marked it for a nominal price, grab it!

Sunday, October 22, 2017

How I Do Rocks

A new visitor, Bill, sent me an e-mail saying he liked how I do rocks on my layout and wondering if I'd done a post about it. I don't think I have. And the more I think about it, how I do rocks is sort of a moving target -- I did them differently when I started scenery work 20 years ago than I pretty much do now, and I have different rocks on different parts of my layout.

Beyond that, rocks are just part of scenery, and I've had different training in scenery. The biggest influence on scenery for me was when I was a member of the old Slim Gauge Guild in Pasadena in the 1970s. One idea I picked up from it was that a layout could be a big gob of scenery with aisles that let you into it. Another was that vertical slopes increase layout area. Another was that columns, doorways, jogs in the wall, and so forth are things that can be used to advantage if you're creative with scenery. Also, several members of the club at the time were geology professors, which lent a lot to how we learned to do rocks.

There are two main areas on my layout, an eastern division and a western division. I lived on the east coast up to when I got out of college, when I moved with my family to the west coast. I still like and model railroads on both coasts (and for that matter, in between). Here are some east coast scenes with east coast rocks:

These areas date back about 20 years. I did them more or less following a Woodland Scenics video issued around that time. I made individual castings from Woodland Scenics molds using plaster of Paris (not Hydrocal). I tiled them onto slopes made from cardboard strips and plaster cloth, sticking them on with Sculptamold and usng Scultamold to fill in between where needed. It helps to let the castings dry for several days, then dip them in water and stick them on while wet. Then I sprayed the whole area with isopopryl alcohol with a plant sprayer to get it thoroughly wet and then used a foam brush to dab on Woodland Scenics scenery colors.

I followed my memory of rock cuts in the areas I'd grown up in back east for the colors. I was thinking mainly of northern New Jersey, Manhattan, the Bronx, and Vermont-New Hampshire. I can't stress enough the importance of DVDs to get good ideas about scenery. Using the alcohol soaking system, dabbing scenery colors over the wet rock moldings, seems to give the colors a certain amount of depth over and above just painting the rocks. I added a lot of ground foam vegetation to fit in the cracks in the rocks, too. Again, DVDs are good for getting ideas here.

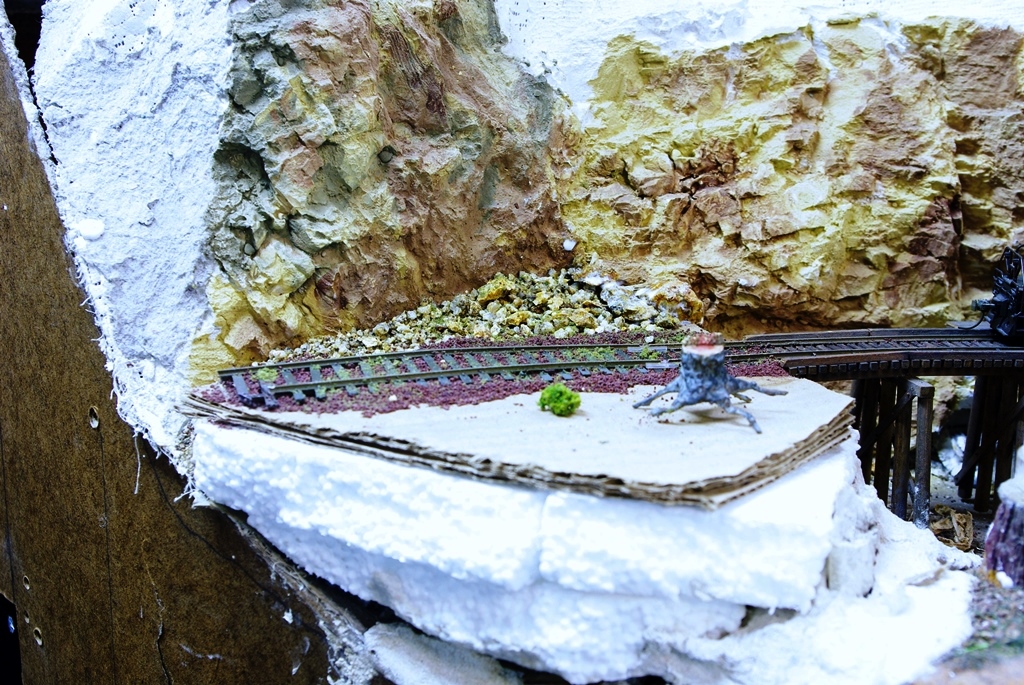
Here is some rock on my western division:

I did these sections the same way as the eastern rock, by tiling homemade plaster of Paris castings from Woodland Scenics molds held on with Sculptamold. However, I mixed up a light tan paint that I used for most of the overall scenery here from interior white latex wall paint mixed with color -- exactly which color, I don't remember. One part of the middle photo above I mixed with Arizona Rock and Mineral pigment and white latex paint. Then for most of the rocks, after the interior latex had dried for several days, I dabbed Woodland Scenics scenery color on with a foam brush and soaked it with isopopyrl alcohol from a plant sprayer, letting the color flow around into cracks. Then I dribbled fine sand and rock onto the overall area and held it in place with wet water and white glue.

The Woodland Scenics video I referred to also talks about using their Burnt Grass extra fine turf to blend things in.

More recently, I used large rubber molds with plaster of Paris poured into the mold when it reaches a pea-soup consistency, then slapped against the scenery base. This was actually how most of the rocks were done on the original Colorado Boulevard Slim Gauge Guild layout in Pasadena. This method has a real potential for disaster, so work to become confident in your technique!

In the case below, I used the large mold technique bordering a finished tiled rock wall.

Any of the techniques I've listed can be used to color this area. It's worth noting, though, that among the lessons I got from the geology professors in the Slim Gauge Guild was the need to complete rock faces with loose talus:

More recently, I've been using flexible foam rock castings from Mountains in Minutes. As I get older and the commercial products get better, I'm likely do do less and less homemade casting and coloring.

Again, it's important to use finer material around these.

When I go railfanning, I often take a couple of old coffee cans with me and collect interesting sand and rock material from the roadside. A collection of different sizes and colors is really helpful.

Wednesday, October 18, 2017

A Fun Trip North

Last week, my wife and I went up north for a few days. I got to squeeze some railfanning in. One of my favorite contemporary railroads is the San Joaquin Valley railroad, made up of spinoff Santa Fe and Southern Pacific branches. Here's the loco shop in Exeter, CA:


This is the sort of railroad structure you don't see much of any more. Here's a GP38 that's just been repainted:


Genesee & Wyoming has pretty much redone the SJVR roster from its RailAmerica days, and it seems to be well ahead of info available on line.

Here's Amtrak Train 714 arriving in Martinez, CA, with a P32BWH and P42 pushing:


I discovered the Western Railway Museum at Rio Vista Jct on this trip. Here's a view out the railfan window of a Key System car running on the museum's ex-Sacramento Northern trackage:

What's especially interesting about this museum is that its trackage is actually former interurban trackage. It was de-electrified by the SN in the early 1950s, but the museum reinstalled overhead wire after 1960 or so using original SN blueprints.

Wednesday, October 11, 2017

The Murphy's Law DCC Install

A guy I recently saw on a reality TV show said, "All lessons cost money. The best ones cost a lot." The most troublesome DCC installs I've run into are for the earlier Atlas S-2 and S-4 locos, inclusing the Atlas-Roco yellowbox and the later Atlas-China ones that use the older Roco design. I haven't tried any of the new Atlas versions, which apparently have sockets for decoders. In fact, I've held off getting any new Alco switchers, Bachmann or Atlas, until I get a lot of my older Atlas ones converted.

These were really good locos in a DC environment. They had good weight for switchers and were very smooth runners. The paint was a real step forward in the Atlas yellowbox era. The trouble is that they were never envisioned for DCC conversion. The motor isn't isolated from the chassis, and in fact, it's held on by a metal screw. Beyond that, the motor brush contacts aren't isolated, with the current fed directly through a weight over the motor. This gives several major points of failure in an install, and according to Murphy's Law, anything that can go wrong, will.

At one point, both TCS (the AS6) and NCE (the ATLS4) made theoretically drop-in decoders for these older Atlas Alco switchers, but they discontinued them very quickly. I think it was because so many things could go wrong in an install and smoke the decoder that they were getting too many "no worries" or "goof-proof" warranty claims to make money on the product.

Poor instructions were probably part of the problem. For whatever reason, I had two installs, both NCE and TCS, go well at first, which made me overconfident, and I then promptly smoked two others. By then, both NCE and TCS had discontinued the products, and I couldn't get an easy (or easier) replacement.

Here is what I learned you absolutely must do:

  • Remove the motor, but first be absolutely sure which is the top side. If you do not do this, and you install the motor back in upside-down, you will smoke the decoder.
  • Insulate the bottom of the motor with tape so none of it can come into contact with the chassis. If you don't do this, you will smoke the decoder.
  • Poke a hole in the tape at the location of the motor mount screw. Replace the metal motor mount screw with a plastic one. If you don't do this, you will smoke the decoder.
  • When you replace the motor, be sure not to lose the universal shafts. This is a pain in the neck, but at least it doesn't smoke the decoder.
  • Isolate the weight that goes over the motor from the chassis with Kapton tape at four points. If you don't do this, or if you don't get it 100% right, you will smoke the decoder.
If you followed all these steps, the old TCS and NCE Atlas Alco switcher decoders could go in and work. But now that these are no longer available, you have to revert to older procedures for a hard-wire. This is a good one, but you have to be sure you make all the cuts on the old PC board correctly. If you don't do this, you will smoke the decoder.

There's one more gotcha: there's very little clearance between the shell and the chassis-motor assembly. If you aren't careful, you can damage the decoder when wires get caught between the motor and the shell. Ask me how I know.

Wednesday, October 4, 2017

Back Again To The Purgatory Box

Here are some more items I found in the box, and some other comments. First, a PRR N8 kitbashed from two Mantua-Tyco cabooses following articles in MR and RMC from the 1970s and 80s (one was in the April 1982 MR, but I think the RMC one gave a more accurate version);

I must have done this at least 25 years ago, certainly before the Bowser cars came out. I cleaned it up and gave it a coat of flat finish. It has Champ decals. I'll need to scrounge some ladder stock to finish it.

Below is what I think must be one of the oldest cars I still have. This is an Ambroid wood and metal car from the 1960s. It was one of a dual kit that I built in my dorm room in college. At the time, I brush painted it and used some really thick varnish called Walthers DDV to flatten and blend the decals.

Over the years, the varnish and decals yellowed, so I gave it a dust coat of thinned light gray. I replaced the stirrups and the trucks and wheels. It actually looks good for a 50 year old car.

Here's a more conventional purgatory box item, a Bev Bel-Life Like covered hopper. The prototype Napierville Junction had PS-2s, but the paint job is really nice.

This spent 20 years in purgatory after I got it at a swap meet in Sacramento when I had a work assignment there. I finally pulled it out and started work making it layout-friendly, with scrap sprues in the truck mounting holes and styrene for the coupler boxes:

Switching gears, I'm getting more and more respect for the Bachmann GP9 as a layout quality loco. With the factory decoder replaced, they're easy to speed match and run in consist with Atlas Classic locos. The Bangor and Aroostook leased locos to the PRR and LIRR in their off season.

The hood louvers aren't correct in their location, and they lack other fine details like grab irons. On the other hand, at the range this photo was taken -- maybe 2 feet -- it's just not noticeable. But the good paint stands out.

I notice that Bachmann has come out with a second road number for the PRR simple keystone scheme GP9. It'll be on my next web order!