Sunday, December 3, 2023

Chinese Plastic Palm Trees

Last August I posted about progress with scenery around my junk yard area. I did some thinking about trees that might establish the area is in California, and I watch a YouTube channel, SoCal Scale Models, where in one episode Rick, the host, explained how he orders ready-made Chinese plastic palm trees off Amazon. He shows what he does in this YouTube:

While I generally prefer eBay to Amazon for stuff like that, I went looking on eBay and found this 18-piece set. What set it apart from many other palm tree models, including the ones Rick used, was that they look like a very common local California type, fan palms, that have fan-shaped fronds and a "beard" of old fronds hanging down from the live ones at the top. These arrived quickly at a very reasonable price. I touched them up with paint I had on hand from rattle cans and brushed acrylics to make them look a little less plastic.

Here's a prototype photo of Washingtonia filifera. The size of the "beards" seems to depend on how often the trees are trimmed and how old they are.
And here's a grove of fan palms along the BNSF at a location called Stoil in the San Joaquin Valley. I'll probably use the smaller trees in the set that are closer to N scale on a T-TRAK module.
There are little swaths of white on the bases of my model trees, because I had just planted them with some Hobby Tac that hasn't dried yet.

Sunday, November 26, 2023

Broadway Limited Union Pacific SD40

I recently found a Broadway Limited HO Union Pacific SD40 at a very reasonable price. What impressed me was that in the past, Broadway Limited diesels have tended to be "generic" models with minimal road-specific details other than paint schemes. This model, which is a recent Paragon 4, is a major exception, more comparable to ScaleTrains or Athearn Genesis, with both road name and unit-specific details.
In part, this threw me off. Previous models of UP SD40s, like the Kato 1990s HO version, have taken the easy way out, being based on the UP's first two orders of SD40s from 1966, numbered 3000-3039 and 3048-3082. These were plain vanilla with the exception of strobe lights on the cab roofs of at least some units. But when I got this model out of the box, the first thing that hit me was the trucks, which had a third brake cylinder and clasp brakes, unlike the 1966 locos. The number also bothered me, 3117, which made me think intuitively that this must have been an SD40-2 number.

So I went looking for more info. The Don Strack Utah Rails roster clarified the number: the UP had a third order of SD40s in 1971, just before the switchover to SD40-2s, numbered 3083-3122, and 3117 would be in this series. This third order was completely new to me, and I thought I was pretty familiar with the UP roster.

I went looking for prototype photos on the web, and the 3083-3122 also had trucks with the extra brake cylinder in the center. The one big difference between the prototype photos and the model is that at least one photo shows that 3117 didn't have a plow, at least at the time of the photo. On the other hand, photos do show other units in the series with the large SD40-2 style plow on the model, and 3117 may have had a plow at other times.

Based on the Don Strack page on UP diesel paint schemes, the paint acheme on this model would date it between February 1984, when the UP changed the color of trucks from aluminum to gray, and June 1986, when classification lights were painted over. However, according to Strack, rhe UP had stopped using class lights some time earlier.

BLI Paragon 4 models have capacitors to improve the sound decoders' performance on dirty track. This loco continued engine sound and lights for about one second after I turned off the DCC track power. The headlights, class lights, number board lights, and cab lights are all separately controllable via function keys on the DCC control station. UPDATE: To control the individual features, you need to set CV 128=1 for "pro mode lighting". Unlike the highest-end recent models, the BLI SD40 doesn't have step lights or ground lights.

My biggest problem with the model was couplers. Both ends of the model come with long-shank Kadee compatible couplers in a proprietary coupler box. While I like long shank couplers when they're used with a plow, on this model, as with the UP prototype, only the front has a plow, so I wanted to replace the rear coupler with a standard-length Kadee 148. The openings for the couplers in the pilot plates on the model will fit a 148-size box, but the mount for the proprietary BLI coupler box is too short for a full 148-size Kadee box. Thus I had to spend a fair amount of time trimming the 148 box to fit, but once I had removed material from both the front and rear of the 148 box, I waa able to install the new assembly with the BLI screw.

Sunday, November 19, 2023

New Decoder In A Bachmann SD40-2

The Bachmann HO DCC-equipped MKT SD40-2 has good paint and decoration, at least for a moderately priced layout-quality model. However, the factory DCC decoder doesn't support the standard CVs for speed matching, so I pulled it and replaced it with a Digitrax DH165A0.

I had initially replaced Bachmann HO factory decoders with the NCE BACH-DSL decoder, which is a drop-in replacement, but I've had frequent problems with all types of NCE decoders where the LED drivers seem to have problems. So far, the DH165A0 seems like a more reliable alternative, although it isn't set up for being attached to the frame using the Bachmann screws. However, Scotch Magic Tape holds it on just fine.

Because the Bachmann factory decoder isn't set up for speed matching, and this version of the model also lacks flywheels, the model straight from the box isn't a good candidate for running in multiple with diesel models by other manufacturers. Replacing the decoder is a fairly low-cost step toward fixing this. (For whatever reason, the Bachmann SD40-2s with sound have flywheels, and the factory sound decoders I think probably also support all the standard CVs.)

I set CV2=15, CV3=2,and CV4=2. The momentum CVs will let it run compatibly with flywheel equipped locos. For whatever reason, the new LEDs that I used with the new Digitrax board are also brighter than the ones with the old decoder, which I like -- always the brighter the headlights, the better.

Sunday, November 12, 2023

Another Atlas Kato GP7

Looking for a bargain that added a mild challenge, I got another Atlas Kato GP7 from the early 1990s on eBay. The price on these can vary from around $60 to over $100, and at the lower end of the range, even with the added price of a DCC decoder, they're less expensive than current equivalents like the Walthers Mainline GP9 or the Bachmann GP7 in DC. Adding the decoder is a little more difficult than just plug-and-play, but it's still an easy intermediate project. Here's New York Central 5690 with Kadees, a Digitrax DH165K0 decoder and LED headlights, and Shell Scale numberboard decals.
The loco apopeared never to have been run when I got it, although it looks like it was outside its box long enough at some point to get some white spray paint droplets on the roof from being nearby when somebody was using a rattle can. I still need to touch some of these up. It also needs to get a winterization hatch.

New York Central 5686-5708 were built in 1952, originally clasa DRS-4H, reclassified ERS-15 in 1966. The class was equipped with dynamic brakes, unlike most other New York Central diesels, including the rest of the NYC GP7s.

Like all Atlas Kato HO diesels, it runs beautifully. Unfortunately, as I get older, it's harder and harder for me to apply the number board decals, and this may be the last Atlas Kato diesel I do.

Sunday, October 29, 2023

Micro Trains Horse Cars

I recently found these Micro Trains horse cars in special at TrainWorld:
I was able to ride old-style passenger trains as a young railfan for about the last dozen years before Amtrak. Horse cars were still around and being used in secondary passenger and mail-and-express trains up to 1971 -- one of my last rides wes on the Santa Fe Super Chief in late 1970, and I saw Santa Fe horse cars in the Chicago coach yard then. If any are still around, they're in museums or work train service.

I also think that by the 1960s, race horses were mostly being flown or towed in highway trailers, so although so-called "horse cars" had stalls for horses, they could be folded away and used in ordinary express service, which was mostly what they were in during the last years of pre-Amtrak passenger service. However, they do turn up in videos of trains in that final era.

I like the Micro Trains models, because they're a different take on baggage and express type cars and will fill in a mail-and-express consist nicely.

Sunday, October 15, 2023

SP Krauss-Maffei Diesel Hydraulics

I've occasionally added brass models to my collection, but I'm happy at this point that there haven't been that many. In general, while it's possible to convert them to DCC, the combination of one-side pickup for steam locos and tenders, or one-side-only pickup for diesel trucks, makes them less suitable for reliable current pickup, and the quality of their mechanisms varies widely among manufacturers. On top of that, we're used to very smooth and quiet operation from later-generation plastic and hybrid models made in Korea, Japan, and China, something brass models have seldom ever achieved.

I have at least one model in my collection that's made me go "hmm", an Overland model of the second, road-switcher style SP Krauss-Maffei diesel hydraulics. I may have gotten this because I thought I remembered seeing these in the San Joaquin Valley, but after studying them further, this was a false memory: according to this site, they were

an order for 15 identical units. They were an experiment in high horsepower diesel hydraulic locomotives that had rather short careers on the SP, being retired by November, 1968.

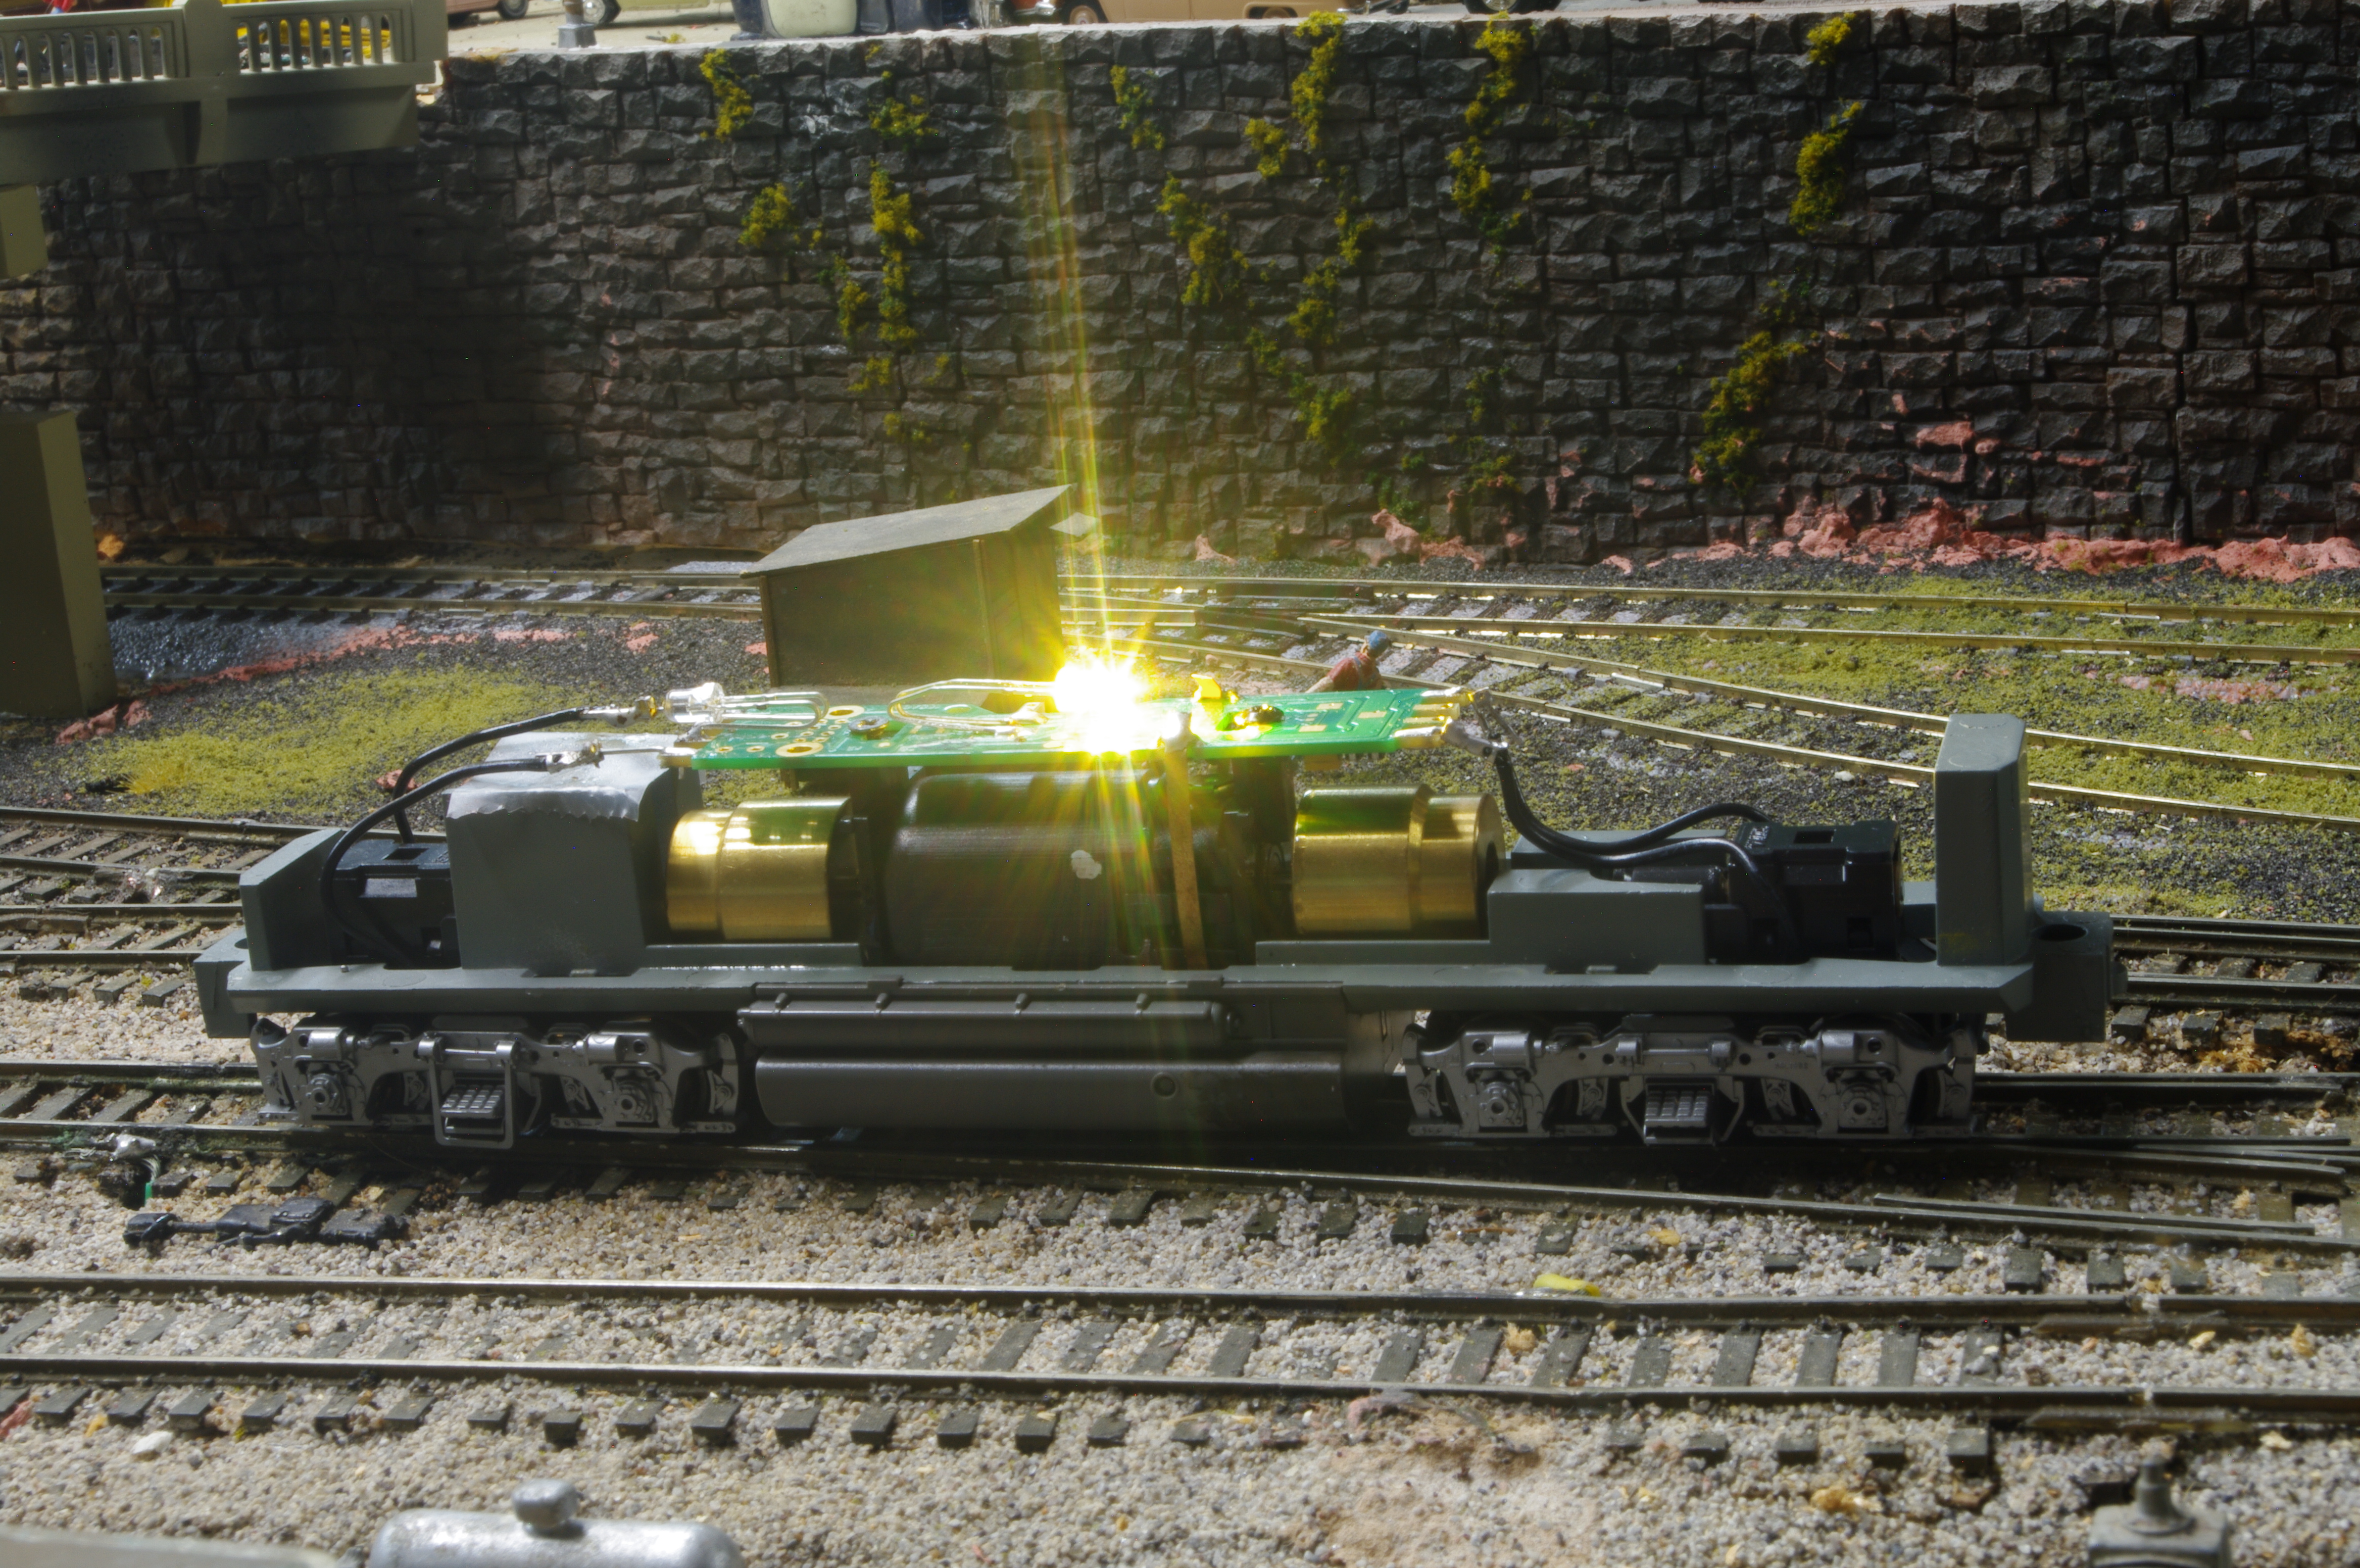
However, the trip down the San Joaquin Valley where I might have seen them took place in June 1969, so I was a little too late. I probably confused seeing SD45s. Here's a photo of my model, which I believe is one of Overland's last run of their K-M:
So far, it's spent its life in a display cabinet. I took it out for the first time not long ago and tested it on DC. Although earlier Overland K-Ms had the older style zamac gearboxes, this has their later style drive with individual worm and gear drives to individual axles, but even so, it's pretty noisy, much noisier than an equivalent Chinese or Japanese plastic and metal diesel. It also has the disadvantage of right rail pickup from the front truck and left rail pickup from the rear, which means it will be less reliable for contemporary layout running than a mass produced Chinese or Japanese loco.

Most brass models were never made with window glass. This model at least has glass, but while there are headlight lenses in the nose, there's no provision for lighting them. So it looks like beyond adding a decoder, I'd have to add a capacitor plus figure out a way to light the headlights and SP warning lights that wouldn't be a wiring nightmare.

The SP 9010 restoration site also makes additional points about the Overland K-M models: in their short lives of a little over four years, the units underwent a great deal of modification. It looks like they were never quite right, but SP persisted as long as they could to make them run before they gave up. The version in this Overland model is basically the appearance of four final units following a last full shopping they received in 1966-67. These units were 9107, 9113, 9116, and 9120.

The most visible change after this shopping was square shoulders on the radiators that were added to extend the capacity of the cooling system. You can see these on the roof of the model at the mid-point and rear of the long hood. Only 9107, 9113, 9116, and 9120 had these, so Overland's number 9117 on the model is incorrect (as far as I can tell, Overland gave these models random numbers in the K-M renumber series when they were painted at the factory).

However, there were numerous other variations on every unit for features like cab windows, sun visor, horns, lettering, and so forth, so that no two were alike, and no Overland model was ever quite correct for any individual prototype unit. So I'm just on the fence over converting this loco to DCC, especially since if I were to operate it on the layout, it would be subject to general wear and tear, and the model itself is just a little too nice to let that happen. So for now, I think it goes back in the display case.

On the other hand, Piko has announced an HO version of the original, cab-unit style SP K-M diesel hydraulics. I may well go for this, as it eliminates all the problems to trying to convert a brass model for DCC, with sound to boot.

Sunday, September 24, 2023

Digitrax DH165K0 Decoder In A Stewart F3A

The Digitrax DH165K0 decoder is meant for 1980s and 1990s Kato HO locos, including those made as part of the Atlas Kato yellowbox line, the Kato-only GP35s from the 1990s, and locos Kato built for Stewart, including their F units and Baldwin road switchers. Their biggest advantages are contacts that mate directly with the flat brass motor contact strips, as well as wire extensions that match the Kato track power wires from the locomotive trucks.

It isn't quite drop-in, but it's not too much harder than an 8-pin plug and play installation. The biggest complication is the need to solder LEDs to the decoder for lighting, including the need to observe the LED polarity.

Here's a DH165K0 mounted in the chassis of a Stewart F3. The F3 and other F unit models with Kato chassis date originally from 1987, so they are the same vintage as Atlas Kato locomotives, and mechanically and electrically they're very similar.

Although the Stewart F units were strides ahead of what had gone before -- especially the redoubtable Athearn F7 -- later units from Athearn Genesis, Walthers, and Broadway Limited have surpassed them in paint and detail. In particular, the Stewart locos came without grab irons or handrails, and they lacked other common details like lift rings. Modelers had to add separate details from sources like Detail Associates and Details West and supplement the paint with decals from Microscale. This turned out to be quite a task for each unit, and I'm grateful for the newer models that have saved all the extra work.

Stewart also had a one size fits all headlight for units that had either a single headlight in the upper position or an upper light and a lower one in the loco nose door. The chassis casting wouldn't allow installation of a bulb or LED shining through the lower position alone. From the box, the A units had an incandescent bulb shining through a brass tube leading to the upper headlight housing.

In this unit, I replaced the incandescent bulb with a wired LED soldered to the auxiliary F0F pads at the center of the decoder. The LED was a little too big to fit inside the brass tube, but I found that if you simply let the LED sit in the circular opening for the tube in the A unit plastic coupler mount, it will stay there.

The upper and lower headlight lenses on the locos with dual lights are a single clear plastic molding, so that light from the upper location bleeds down into the light in the door. Without a great deal of extra work, this is as good as you're going to get, and while prices on eBay for these units vary widely, the small price differential between, say, a Stewart without a DCC interface and no handrails versus a comparable current-run DC-only Walthers Mainline loco, even with basic detail, makes the Walthers Mainline a better choice.

On the other hand, I coilected a lot of these Stewart locos in the 1990s when they were the only thing available, and I think if you have them, they run very well, and they're worth the DCC upgrade.

Sunday, September 17, 2023

Kato 1990s HO GP35s And The Digitrax DH165K0 Decoder

The Kato HO GP35 was originally released about 1992, and it was reviewed in the September 1992 MR. Kato re-released the model in 2015 with two big updates, draft gear boxes that were compatible with Kadee couplers, and a PC board with an 8-pin DCC socket. The 1992 model, which had more in common with the 1980s and 1990s Atlas Kato HO models, didn't have these features.

However, unlike the Yellowbox Atlas Kato locos, it did have cab interior detail. Although this was rudimentary in comparison with contemporary high-end models, it was an improvement, but it did affect DCC conversions of the 1990s GP35, since the front light bar ran through the cab interior and requires a different style of LED mount on a decoder. The Digitrax DH165K0 is the only decoder on the market that I'm aware of that's specifically designed to accommodate this problem with the 1990s Kato GP35.

The DH165K0 instruction sheet details rthe installation procedure, including how to solder LEDs to the decoder. A finished Kato GP35 chassis with a DH165K0 and LEDs soldered on and set up for bidirectional lighting is shown below:

The decoder has solder pads that allow a forward-facing LED to be mounted in the center of the decoder to interface with the front light bar that runs through the cab and terminates well behind the cab rear wall. The rear-facing LED can be mounted on the rear of the decoder. Some care has to be taken with both to keep them from getting in the way or either light bar, but it's possible to mount directional LEDs without cutting the light bars, unlike with the Atlas Kato HO locos.

Another problem that's partly visible in the photos above is that the cab interior can push the wires leading from the front truck to the decoder out of position when you reattach the shell, which can potentially result in the wires rubbing against the universal shaft that leads to the front truck. This can result in noisy running, so you have to be careful to make sure those wires are out of the way in decoder installation.

A problem with the 1990s Kato GP35 is also that it was meant to use horn-hook couplers, and the pilot and chassis don't quite match the old Kadee #5 style coupler box. They don't match the newer Kadee whisker-style #148 coupler box at all. You're best off using #5 style coupler boxes with the "ears" completely cut off, and then the whole assembly filed or sanded slightly thinner. You can tap the existing hole for the coupler mount in the chassis with a 2-56 tap and mount the box with a #2 machine screw.

I had a small backlog of Kato 1990s GP35s that I'd hesitated to convert to DCC until I discovered how much easier the DH165K0 makes the job. Here are two I've recently done:

You can see the LED-powered headlight especially well on UP 762. I still need to add Shell Scale UP style numberboards on this loco. Both locos are also still waiting for prototypical horns.

Wednesday, September 6, 2023

I've Found A Good Solution For Adding DCC To Atlas Kato HO Locomotives

I became a dedicated collector of Atlas Kato yellowbox HO engines from their first release in 1985. The 1986 RS-1 and the 1990 GP7, with their heavy metal frames, were even better. I was a late adopter of DCC, starting only in 2012, so I'd accumulated a good number of Atlas Kato locos, all of which had been developed before DCC arrived in the mid 1990s. This meant that at some point, I'd have a project on my hands to convert all of them, and none would have anything like an 8-pin socket for an NMRA plug.

At various times I've tried the NCE DA-SR and the Digitrax DH165A0, which are nominally intended for Atlas locos. It's only been very recently that I'd even heard about the Digitrax DH165K0, which is nominally intended for Kato HO locos without 8-pin NMRA sockets. But other than the Atlas Kato yellowbox locos, I think the Kato HO GP35 is the only one that doesn't have an NMRA socket, although the old pre-Bowser Stewart Kato locos are also compatible with the DH165K0.

But I finally tried a Digitrax DH165K0 on an Atlas Kato HO GP7:

There are two big advantages to the DH165K0 over the DH165A0 for Atlas Kato locos. The first is that the contacts for the motor leads are designed specifically for the flat brass strips that reach up to the Kato plastic distribution plate on top of the motorr that carries the contact wires from the trucks and the single incandescent headlight bulb. The second is that the DH165K0 carries wire extensions from the track power nubs at the end of each end of the decoder that correspond to the former brass wires on the Kato plastic contact plate over the motor. Both make the conversion more of a drop-in with less need to strip the track power wires from the trucks or solder new wires to the flat brass motor contacts. Also, the interface between the flat brass strips and the decoder gives you a positive forward and reverse for the install without the need to test the motor polarity.

I've also found you can bend golden white LEDs as shown in the photo above and solder them directly to the headlight contacts on the decoder for bidirectional LED headlights.

With the bidirectional LEDs installed as shown, you need to shorten the light bars for the headlights. You can do this with wire cutters directly on the light bars still in position the body shell. There is no need to flatten or polish the cut ends for the light to pass through to the headlights on the shortened light bars.
In the 1990s I got four Altas Kato Illinois Central GP7s. I renumbered two of them with the old Herald King decals, which I think worked out well. I got four due to family connections with the IC, as my uncle worked variously for the Lackawanna, the Western Pacific, and the Illinois Central, winding up his career as the CEO of IC.

Sunday, August 27, 2023

Renewed Scenery Work

Last December I posted on the start of new scenery work on a junk yard surrounded by California San Francisco Bay area scenery. Progress was sometimes slow and frustrating, but I've finally made some satisfactory progress on the scene. I was prompted by this photo I posted last week:
I could see I had the start of a good scene, but I needed to finish it out so that full scenery would at least be visible surrounding any loco that I photographed here. This is what the frame looked like without a loco in the foreground:
After a week of work, this was the improvement. Still some touchup work needed, but basic ground cover has been extended:
Here's the current view looking toward the junk yard, which is a Bar Mills Bull's Salvage kit plus various cast resin junk yard items:
Oak and palm Trees, yellow grass, and brush still to come.

Sunday, August 20, 2023

Two More DCC Projects

I've managed to make some more progress on DCC installs. The first is an Atlas Silver Southern Pacific FM Train Master:
Although these came with 8-pin NMRA DCC sockets, the wiring was otherwise bare-bones. There is a circuit panel at each end of the hood behind the headlights for a number of SMD LEDs that light up the headlight, warning light, and number boards, but they're all wired together, and they all operate only together via F0 forward or reverse. If you want to set up the oscillating warning light to turn on and off separately and shine brighter and less bright, you basically need to get rid of those factory circuit boards, add wiring for new LEDs, and start over with a decoder that has extra lighting functions.

This didn't strike me as worth the extra effort, especially as the SP also had larger number boards to carry the train numbers for the peninsula commutes. The bottom line is that down the road, someone is going to have to issue a next-generation Train Master model, likely not in my lifetime if ever. On this one I simply installed a Digitrax DH126P and called it done. Looking at the photo, I see I need to add an SP 5-chime horn.l

The Train Master inspired me to pull out a couple of Keil Line ex Holgate & Reynolds SP bi levels I built from kits almost 30 years ago. I think they were old stock and out of production even then.

I also installed a Digitrax DH165A0 decoder in an Atlas Classic Tidewater Southern RS-1. I'm not sure if Atlas ever did a run of these with 8-pin sockets. This one didn't have one.
The unfinished scenery in the background is meant to be a start on some Northern California-style landscape that I started maybe a year ago and left to simmer. Now that I've tried using this scene as a photo backdrop, I'm going to resume work on it.

Sunday, August 13, 2023

Walthers/Life Like DL-109 DCC Install

I'm continuing to plug along with installing DCC in locos I've collected in the pre-DCC era. The latest is this Walthers post-Life Like DL-109:
This is an easy plug-and-play install using a Digitrax DH165L0 decoder. The old Life Like circuit boards, which Walthers continued to use, were backward from the usual standard, with male 8-pin prongs on the board itself, rather than sockets for the 8-pin NMRA plug. The Life Like circuitry had an 8-pin socket, which you remove from the Life Like circuit board, and you discard the circuit board entirely. You then replace the circuit board with the Digitrax decoder. No soldering is needed, and the Walthers version of the loco already has an LED headlight.

The only difficulty I found was that the front coupler on these units sits in a unique swivel mount that easily falls apart and scatters its pieces when you unscrew it to remove the loco shell. I spent quite a lot of time retrieving the parts and getting things back together once I installed the decoder, but now I know what to look out for in the future, since I have another New Haven and two Rock Islands still to do.

Sunday, August 6, 2023

Checking In On California High Speed Rail

A California high speed rail project connecting Los Angeles and San Francisco was originally proposed in 1996. By 2008, the project was put to voters in Proposition 1A, with the full project intended to be completed in 2020. It has successively fallen short of all its goals, and by February 2019, Governor Newsom announced the project would be cut back to a segment between Madera and Bakersfield, 119 miles. Newsom implied that it would never be completed between Los Angeles and San Francisco.

Construction on this limited section began in 2019. I've checked in on progress now and then on trips up the San Joaquin Valley, but there's actually not much to see. The first photo below is progress on a jumpover where the high speed line crosses over the BNSF at Shafter, just north of Bakersfield. I took all these photos in May 2022.

Here is another jumpover near Wasco, a little farther north.
These are pillars to hold up the largest viaduct on the current project, 6000 feet long, passing over highways and the San Joaquin Valley Railroad in Hanford.
A discussion thread on the Altamont Press board has recently pointed out that although construction of roadbed and bridges is under way, the US Department of Transportation is so far only prepared to fund track, signals, and "maybe" electrification on the current 119 mile Bakersfield-Madera segment. Funding of any further segments on the whole route is currently unlikely, and in fact the precise route either north to San Francisco or south to Los Angeles has never been established in any case.

But even if track is laid on the 119-mile segment, there won't be any trains to run on it. The discussion raised the possibility that existing California Department of Transportation equipment with F59PHIs, Siemens Chargers, and bi-level California cars might be used and rerouted onto the high speed infrastructure off the BNSF line currently used, but these are designed for a maximulm speed of 125 mph, not the 200+ mph originally intended for the project.

An additional problem is the jumpovers currently being built for the line, two of which are illustrated above. These have relatively steep grades leading up to them, even though the San Joaquin Valley is largely flat. Pure high speed trains like those in Europe can handle this type of grade by having powered trucks under the coaches, which results in very high power to maintain speed over these hills. High speed lines aren't designed for diesel-hauled conventional coaches.

There may even be serious questions over whether the high speed rail bridges were designed to carry the weight of a loco like a Siemens Charger, which is 130 tons. Thus it's entirely possible that the billions spent on this project can't even be repurposed for "higher speed" rail in the 125 mph range.

Sunday, July 30, 2023

Micro Mark Track Cleaner On A Stick

I recentlyh discovered this Micro Mark tool, a track cleaner on a stick. My layout has a number of hard-to-reach areas for track cleaning, whether it's distance from the layout edge, structures, bridges, or tunnels. This is reasonably priced in the $20 range (currently on sale). It consists of three threaded rods that can extend to 30 inches, plus a cleaning head.

The cleaning head is pretty effective at polishing away stubborn spots of oxidation and dirt. This seems to be less expensive but with greater reach than the Woodland Scenics Rail Tracker cleaning kit, which is a similar idea, but the Rail Tracker looks a lot more complicated.

Sunday, July 16, 2023

Recent Post-2000 Refrigerator Car Model Announcements

I've been interested in the post-2000 refrigerator car fleet for some years. I posted on BNSF and Union Pacific/ARMN cars here, and on CRYX cars here. Up to now, the only models of these have been Walthers kit and ready-to-run models of CO2-based cars from the 1990s that barely lasted into the 2000s, plus high-end models of Union Pacific/ARMN cars from BLMA, subsequently Atlas, and ExactRail, now ScaleTrains.

About a week ago, Walthers announced on its New Product Express YouTube channel that it would be running models in its mid-level Mainline range of what appear to be the same prototypes as the BLMA/Atlas and ExactRail/ScaleTrains cars.

The modern reefer announcement starts at about 14:10. Exactly which prototype these are is a little confusing. Walthers calls them 72-foot cars, but it isn't clear whether this is 72 feet inside length, which would be BNSF, TILX, and late UP cars, or 72 feet over sills, which would be 64 feet inside length, which would be the already-modeled UP/ARMN cars in the 110000 and higher number series. Illustrations off the Walthers site, as well as the YouTube announcement, indicate the cars will be lettered for BNSF, ARMN, CEFX, TILX, and CGFX, but the description on the video says they are "based on a reefer introduced in 2019 and now in service nationwide."

However, the BNSF and ARMN cars in the paint schemes shown in the video date from 2000-2002. CRYX has somewhat later cars, but from information I've seen on Facebook, CRYX will not license its artwork for use on models, so no CRYX cars will be in the Walthers run. I'm not sure what Walthers means when they say their prototype was introduced in 2019.

In any case, I'm left a little puzzled about just which prototypes are closest to the Walthers Mainline cars. Here are two illustrations from the Walthers site:

The UP/ARMN prototype is 64 feet inside length, while the BNSF prototype is 72 feet inside length. This means that one model should theoretically be longer than the other.
However, they are pretty clearly the same length in proportion in the photos. My guesstimate based on overall proportion is that the models are both based on the UP/ARMN cars. Although these have already been run from two makers commercially, the Walthers versions will be more in a mid-range price, and they'll have additional paint variations. So it looks like BNSF modelers will have a car lettered for BNSF, but it won't be as prototypical.

But ScaleTrains also announced a BNSF modern reefer this past April, which should arrive December 31. The photo below is from their site:

This means that BNSF modelers will have more accurate cars with this run, but so far, only the earlier paint scheme shown in the photo has been announced, but not BNSF 793810-794699, which were built by TrinityRail, Jun-Oct 2004, like the photo below:
These have different side sills and lack the frosty paint decoration at the roof. The ScaleTrains BNSF cars will be high-end models available with sound and lighted control panel, or without.

Sunday, July 9, 2023

Track And Clearance Work At CP Drains

I've been doing some track cleaning, electrical and mechanical troublshooting, and clearance work around my main line. In particular, I worked on a problem I'd discovered whereby my recent GE locos were derailing on the superelevated curve at CP Drains. I looked at the curve carefully and saw that the superelevation wasn't consistent. It was a pretty easy fix, I jacked up the low spots with a screwdriver and shoved in some cardboard shims to make the level consistent.

I refreshed the ballast with some Arizona Rock & Mineral ballast I had on hand. This covered up the original Woodland Scenics ballast, which after 25 years or so had changed color. It was a big improvement.

The rock castings will also meed to be touched up, and the whole area needs more vegetation.
I ran a 3-unit test consist, including two Walthers Mainline ES44ACs, back and forth through the area to be sure the problems were solved. There was also a slight clearance problem with the tunnel portal on the curve. I widened the far edge of the portal with my Dremel and touched up the paint with aged concrete. I've seen a number of videos showing prototype portals like these, and they often aren't symmetrical.
Here's the test consist rounding the curve the rest of the way. The vegetation here was recently applied, and I need to clean it up where it impinges on the far track.
The scenery below the track needds to be replaced and refreshed here, too. But it feels good to have the trackwork back up to snuff.

Sunday, July 2, 2023

A Couple More Superliners

I've had a number of HO Superliners in my backlog, especially some Walthers Phase IV Superliner IIs from their original run in, I think, the late 1990s. The work has involved applying the car number and name decals where applicable, converting the couplers to Kadees, in some cases adding grab irons, and painting the truck sideframes. The one below is (I think) the only sleeper I have, the 32081 Illinois. Not all the Superliner IIs that were assigned state names had them applied. However, I rode the Illinois to Chicago in 2008 on the Southwest Chief, and it had its name applied and was still in Phase IV paint at the time.
Amtrak 34951, the Redwood Grove, was rebuilt by Amtrak in 2009 with funds from the State of California and painted in Pacific Surfliner colors. I got this in anticipation that Athearn Surfliner cars would arrive fairly soon, but as of now, they're at least a year overdue. Ordinary Superliner coaches in Amtrak Phase IV-IVb have also been used on the Pacific Surfliners from the start. These were originally from a series specifically equipped for push-pull service, but as I understand this, Superliner coaches have gradually had push-pull wiring installed overall.
Amtrak 470 is an original run Athearn RTR F59PHI I think from the early 2000s. This didn't have a DCC socket, but I did a hard-wire conversion with a Digitrax DH126P. I believe that for a time, Amtrak operated Cascades with Superliner coaches and sightseer lounges between the time the F59PHIs were delivered in 1994 and the Talgo Cascade sets arrived in 1996. Cascade-painted F59PHIs have sometimes wandered out of Cascade territory as well.
With the HO Superliners I have, three Phase IV coaches, two Phase III coaches, and a Phase IV sightseer lounge, plus the one sleeper, I'm best equipped to run certain Michigan and Illinois service trains that have periodically used Superliners, or a 1994-1996 Cascade.. This is in many ways just as well, since a full Amtrak long distance Superliner train of baggage, three sleepers (one transition), diner, sightseer lounge, and three coaches, nine cars total, takes up quite a bit of layout.

Sunday, June 25, 2023

Progress On The Bare Table T-TRAK Module

I added a Kato crossover to the bare table T-TRAK module I posted about two weeks ago, with the building flat of the Washington DC Morrow Hotel.
In addition to laying track, I added my standard terminal strips beneath the baseboard. This is one plus to T-TRAK that nobody seems to recognize: you can use the Unijoiners to carry the DCC bus through each module and onto the next, but by using terminal strips to carry drops from each track, you can connect individual DCC-driven components like switch machine stationary decoders and NCE Illumimators with JST sockets for NCE Just Plug lighting features without any inter-module wiring.

Visible below the lower terminal strip in the photo is a tiny Digitrax DS51K1 stationary decoder that drives the Kato crossover.

It's worth pointing out once more that a crossover between the mains is simply not practical for normal T-TRAK standards. It would require a level of dispatching and discipline in a large T-TRAK meet, even with DCC, that I don't think ordinary model railroaders would be capable of. On the other hand, if T-TRAK is done at least partly for home use, it adds a great deal of flexibility and operating potential to a small layout configuration, temporary or semi-permanent. On the other hand, you can take your standard T-TRAK modules to a meet and leave the one with the crossover home.
Here I've begun to incorporate the module with the crossover into an L-shaped temporary arrangement with the building flat I mocked up two weeks ago back on it. This shows that it's possible to operate a home-use T-TRAK layout even without a full oval that can incorporate push-pull style passenger operation at minimum, but I'm still playing with other ideas.

Sunday, June 18, 2023

Walthers Phase IV Superliners

I got several Walthers Phase IV Amtrak Superliners from their original run more than 20 years ago. As best I can tell, I never got a complete set of them for a long-distance train, but I find I do have three coaches, a lounge, and a sleeper. In their original release, they were more like a starting point than a finished model, and I worked on them in spurts now and then over subsequent years. The biggest obstacle was having to drill for and add grab irons and handrails. I never completed this task, but I did finish it on three of them, including a coach and the lounge below:
Among the uncompleted tasks that came with those original cars was the need to add numbers from decal sets supplied. I finally finished this with all the cars, and in addition, I painted the trucks and added Kadee couplers. Some of the Superliner II cars had silver trucks, which I copied on my models.
More recent Walthers Superliner runs have more complete paint jobs on the cars in Phase IV and IVb, and later still metal plating and interiors. The original-run cars didn't have interiors. I'm inclined to question whether metal plating adds a whole lot to Superliner models, as the finish on the prototype isn't really shiny, as you can see below:
Amtrak 32078 was a Superliner II still in Phase IV paint on the Southwest Chief in 2008. As far as I can tell, the Superliner IIs were delivered in Phase IV paint and ran with Superliner Is in Phase II and III for some time after delivery. Here are the two schemes on the Coast Starlight in 1995:
If you compare these photos with the early Walthers models, the silver/platinum mist paint on the models doesn't look all that bad.