Friday, September 28, 2018

Stock Traffic

When I started this layout, I kept meaning to include stock traffic, but I never really got around to it. However, I discovered some stock projects that were lying around almost finished, so I decided to get going with them.

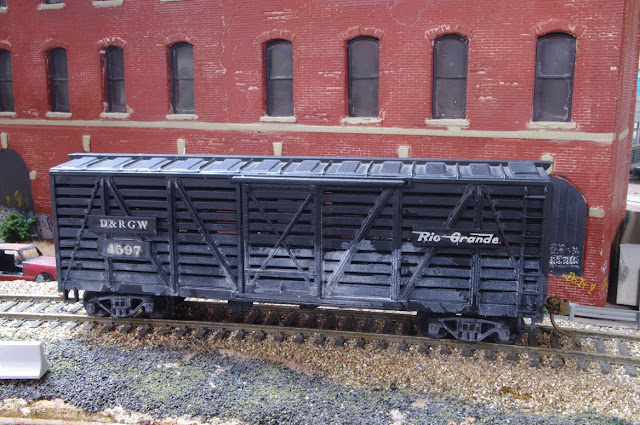
The biggest is probably the oldest car I still have in its original form, a Tyco Rio Grande stock car from about 1961. My memory is that my dad took me to the hobby shop to get it as a reward for good grades, which up to then had been in short supply. Over the first several years I had it, I gradually worked on the paint and lettering. The original flying Rio Grande on the Tyco car was orange, so I painted that out and replaced it with a decal at some point in the 1960s.

I wasn't satisfied with the number that was on the car for whatever reason, so I painted it out and replaced it with a decal. I do remember how frustrating it was, in the 1960s, to find out what numbers Rio Grande stock cars actually had. Equipment Registers weren't part of the vocabulary at the time, I couldn't locate photos, so I just gave it any old number. I'm on the fence as to whether to correct this.

I did remove the horn-hook couplers from the trucks, but typical of teenage modeling in the 1960s, I just glued some Kadees to the floor, which of course wasn't satisfactory. Not long ago I pulled this out and attached a new set of Kadees with screws.

To do the job properly, I'll still need to replace the trucks completely.

I pulled out a Walthers 1990s GN stock car kit and an Accurail run from about the same period:

Then I turned to the question of how to load and unload stock cars. Stock pens actually take a lot of space, as do stockyards connected with slaugherhouses. I don't have room for any of that. I did find a laser stock loading ramp kit on eBay that was pretty reasonable, and I added it to Malabar:

I'll need to weather it more. I'll probably add one of these to the spur at Tennessee Pass as well:

Friday, September 21, 2018

T-Trak Progress

My T-Trak modules have been going slowly, although I've expanded the layout to a 30" by 6' folding table. I've started scenery work and finished some basic wiring on one of the new modules:
One advantage, that I've talked about before, of my approach to T-Trak is that the DCC bus uses the Unijoiner connectors to pass current between modules. Each track is connected to a single terminal strip on the bottom of the module. If any connection via Unijoiner connectors is unreliable, any other connection will pass the current to the terminal strip, so that the overall electrical net is very reliable.

Also, the DCC bus is available on the terminal strip on each module. In this case, I can connect a Digitrax DS52 switch controller to the bus on the terminal strip and address it via my PowerCab. As I add structures, I can also add NCE Illuminator decoders for the Woodland Scenics Just Plug lighting system. These are also powered off the DCC bus and can be connected to the terminal strip on each module.

The electrical work and DCC decoders are self-documenting on the bottom side of the module surface. This continues with the idea that each module is self-contained, but there's a lot more function available than with the standard T-Trak system.

I'm starting to follow Roy Smith's ideas (via the YouTube channel linked in the last post) on ballasting Unitrack. Scenery on this module is started. The foam area will be covered with spackle and then ground cover and vegetation added. There will be an industry located on the spur.

The big "communal" T-Trak layouts tend not to have switches on the modules, since you really can't have individual module owners throwing switches and interfering with the main line trains. In addition, the T-Trak standards require the two main lines to have opposite polarity, so you can't have any sort of crossovers between the two main lines. I think this is unnecessarily limiting for home use. The ability to cross trains from one main to the other is a very good feature for home operation.

Thursday, September 20, 2018

A Couple Of Very Different YouTube Channels

Considering the possibilities available with Kato Unitrack in N, as well as Kato N equipment covering the contemporary passenger scene, I'm surprised there's so little on these subjects on YouTube. But there are two exceptions.

One is Roy Smith's N-Scale Union Pacific Evanston Subdivision YouTube channel. What I like in particular is that Roy updates his channel at least once a week. The episodes are well shot, intresting, and done with a script, which a lot of modelers don't do. Here's an example:

Roy is a friendly guy. He lives in Panama, which leads to some interesting problems for his modeling, but his layout is an inspiration.

Another YouTube channel I found recently is very different, but this guy is clearly having fun:

This guy has a lot of well-shot prototype scenes as well, and he also likes airliners. I spent the last part of my working career doing heavy traveling -- at one point, I commuted from Los Angeles to Connecticut -- so I identify airliners with a certain amount of suffering. But even the die cast airliner models he shows look like you could find a way to include them on a layout.

Both channels are inspiring as far as I'm concerned.

Saturday, September 15, 2018

ScaleTrains Norfolk Southern C39-8

I recently got one of the new ScaleTrains Norfolk Southern C39-8s. These models have a lot of pros and a few cons, which I'll discuss. The version I got was DCC-ready with no sound, with as-delivered details and paint. Since they were set up to run long hood forward as delivered, here's a shot of it the way it's supposed to be:
At some point in the late 1980s, NS decided to turn things around and run locos short hood forward. I get the impression from DVD videos that NS, like Norfolk and Western, actually never had a specific preference for which direction locos should operate. Even after N&W went to low short hoods, and even before NS formally designated the short hood as front, you could see locos running with the short hood forward. Here's the loco facing the other direction.
The DCC ready version comes with a 21-pin plug for a DCC decoder. However, only the ESU LokPilot decoder will operate all the model's lighting functions. In addition, the DCC-ready loco has a keep-alive capacitor built in, and only the ESU LokPilot will allow the capacitor to function correctly. I did in fact get a LokPilot to use with the loco, and it functions as specified in the ScaleTrains owner's documentation. Here's the chassis with the LokPilot installed:
The LokPilot goes in with the white circular sticker facing up. The DCC and sound loco sells for $249.99. The DCC ready goes for $164.99. A LokPilot decoder with 21 pin plug goes for $26.39 at MB Klein. This totals $191.38 for a DCC loco without sound, not cheap.

The two biggest cons of this loco are the problems with shell removal and the related problem of couplers. The shell comes off simply enough, that is, once you get the couplers out. The problem is that the plows interfere with removing the coupler pockets, which must come out to get the shell off. This requires a great deal of fiddling that is almost inevitably going to disturb the various details on the loco. One set of end handrails simply fell off the loco as soon as I took it out of the shipping sleeve; another came off in the process of trying to get the couplers out.

It's a good loco, but some of these features are too clever by half. In addition, the ScaleTrains couplers are their own design, without magnetic loops for Kadee type opration, and the coupler boxes are too narrow for simple Kadee drop-in replacement. I found a couple of YouTube videos that show how to use a Dremel to grind some width off the Kadees to get them to fit. As you can see in the photos, I did this and replaced the stock couplers with Kadee 156 long shank scale head whisker couplers, which fit if you grind a little width off the rear portion.

The lighting features with the LokPilot and the NS version of the loco are:

F0 turns on the headlight, which changes direction with the direction of the loco.

F1 turns on the numberboards. These stay lit in both directions -- I'm not sure if you can tweak this with a CV.

F2 turns on the class lights -- these also stay lit in both directions, again, I'm not sure if you can tweak this with a CV.

Getting the shell off, installing the decoder, and replacing the couplers, plus putting the end handrails back in place, especially after one fell on the floor and I had to go hunting for it, was a non-trivial task. I hope ScaleTrains will revisit the coupler issue on future runs.

However, the loco is very well detailed, with a fair amount of detail visible through the screening on the body vents. It is a very smooth runner, and this may be the first loco I've installed a decoder on that started running at sped step 1. When I turned off track power to test the keepalive capacitor, the headlights stayed lit for only about a second. I think this feature is primarily to avoid interrupting the sound decoder, not to overcome major dirty spots on the track. But it's there. So I'm happy with it, but I'll need to be even more extra-careful with the CR unit I've ordered.
Friday, September 7, 2018

Rolling Stock Update

Here's a project I pulled out of the big swap meet in the closet: a Sheepscot Scale Products pile driver conversion for the Walthers derrick:
Clearly it's done and just waiting for paint, couplers, and so forth. I think what had me stumped was deciding what road to paint it for -- it's just a sorta-kinda model, so any one would do, and that's probably what's held me up. Another issue is what to use for an idler, but I'm pretty well settled on a Tichy 40-foot flat. I'm leaning toward Virginian, using the Great Decals VGN crane set.

I've been working on adding post-2010 conspicuity stripes to more of my fleet. I have a lot of hopper cars, but the traditional steel hoppers are quickly disappearing, although you can still see some in post-2010 DVDs. Here are a few:

This one is old McKean tooling from the 1970s. ConCor took this over in the 1980s and did them in Conrail and NS, among others, although the trucks they used were horrible. Also, newer best-practice is to attach couplers with coupler boxes and lids that have screw mounting, so I did this mod. Also, the NS ex SOU paint on the original ConCors was very approximate. I painted out the pre-1980 lube plate and substituted the smaller post-1980 version and also painted out the top CAPY line in the data. I also added the conspicuity stripes.

It's OK if the stripes are crooked, they are on the prototype.

I got a crate of a dozen of these cars with individual numbers sometime in the 1980s and am still working my way through them. Most won't get the conspicuity stripes, as these cars are disappearing and mostly now used in MOW service.

As best I can figure, Conrail equipment that went to CSX was lettered for NYC but often kept its Conrail paint otherwise. Conrail cars that went to NS weren't relettered and stayed CR. Thus you can see CR hoppers like these running now with post-2010 conspicuity stripes.

CN acquired the Bessemer & Lake Erie in 2004. Walthers brought out a pair of B&LE lettered cars from old Life Like tooling with CN website lettering but no conspicuity stripes. I added these, again not too worried if they're crooked. Like other steel hoppers, these are used less and less in coal service and now seem to be used mainly in Michigan and Minnesota ore service on former DM&IR and Wisconsin Central lines.