Sunday, September 24, 2023

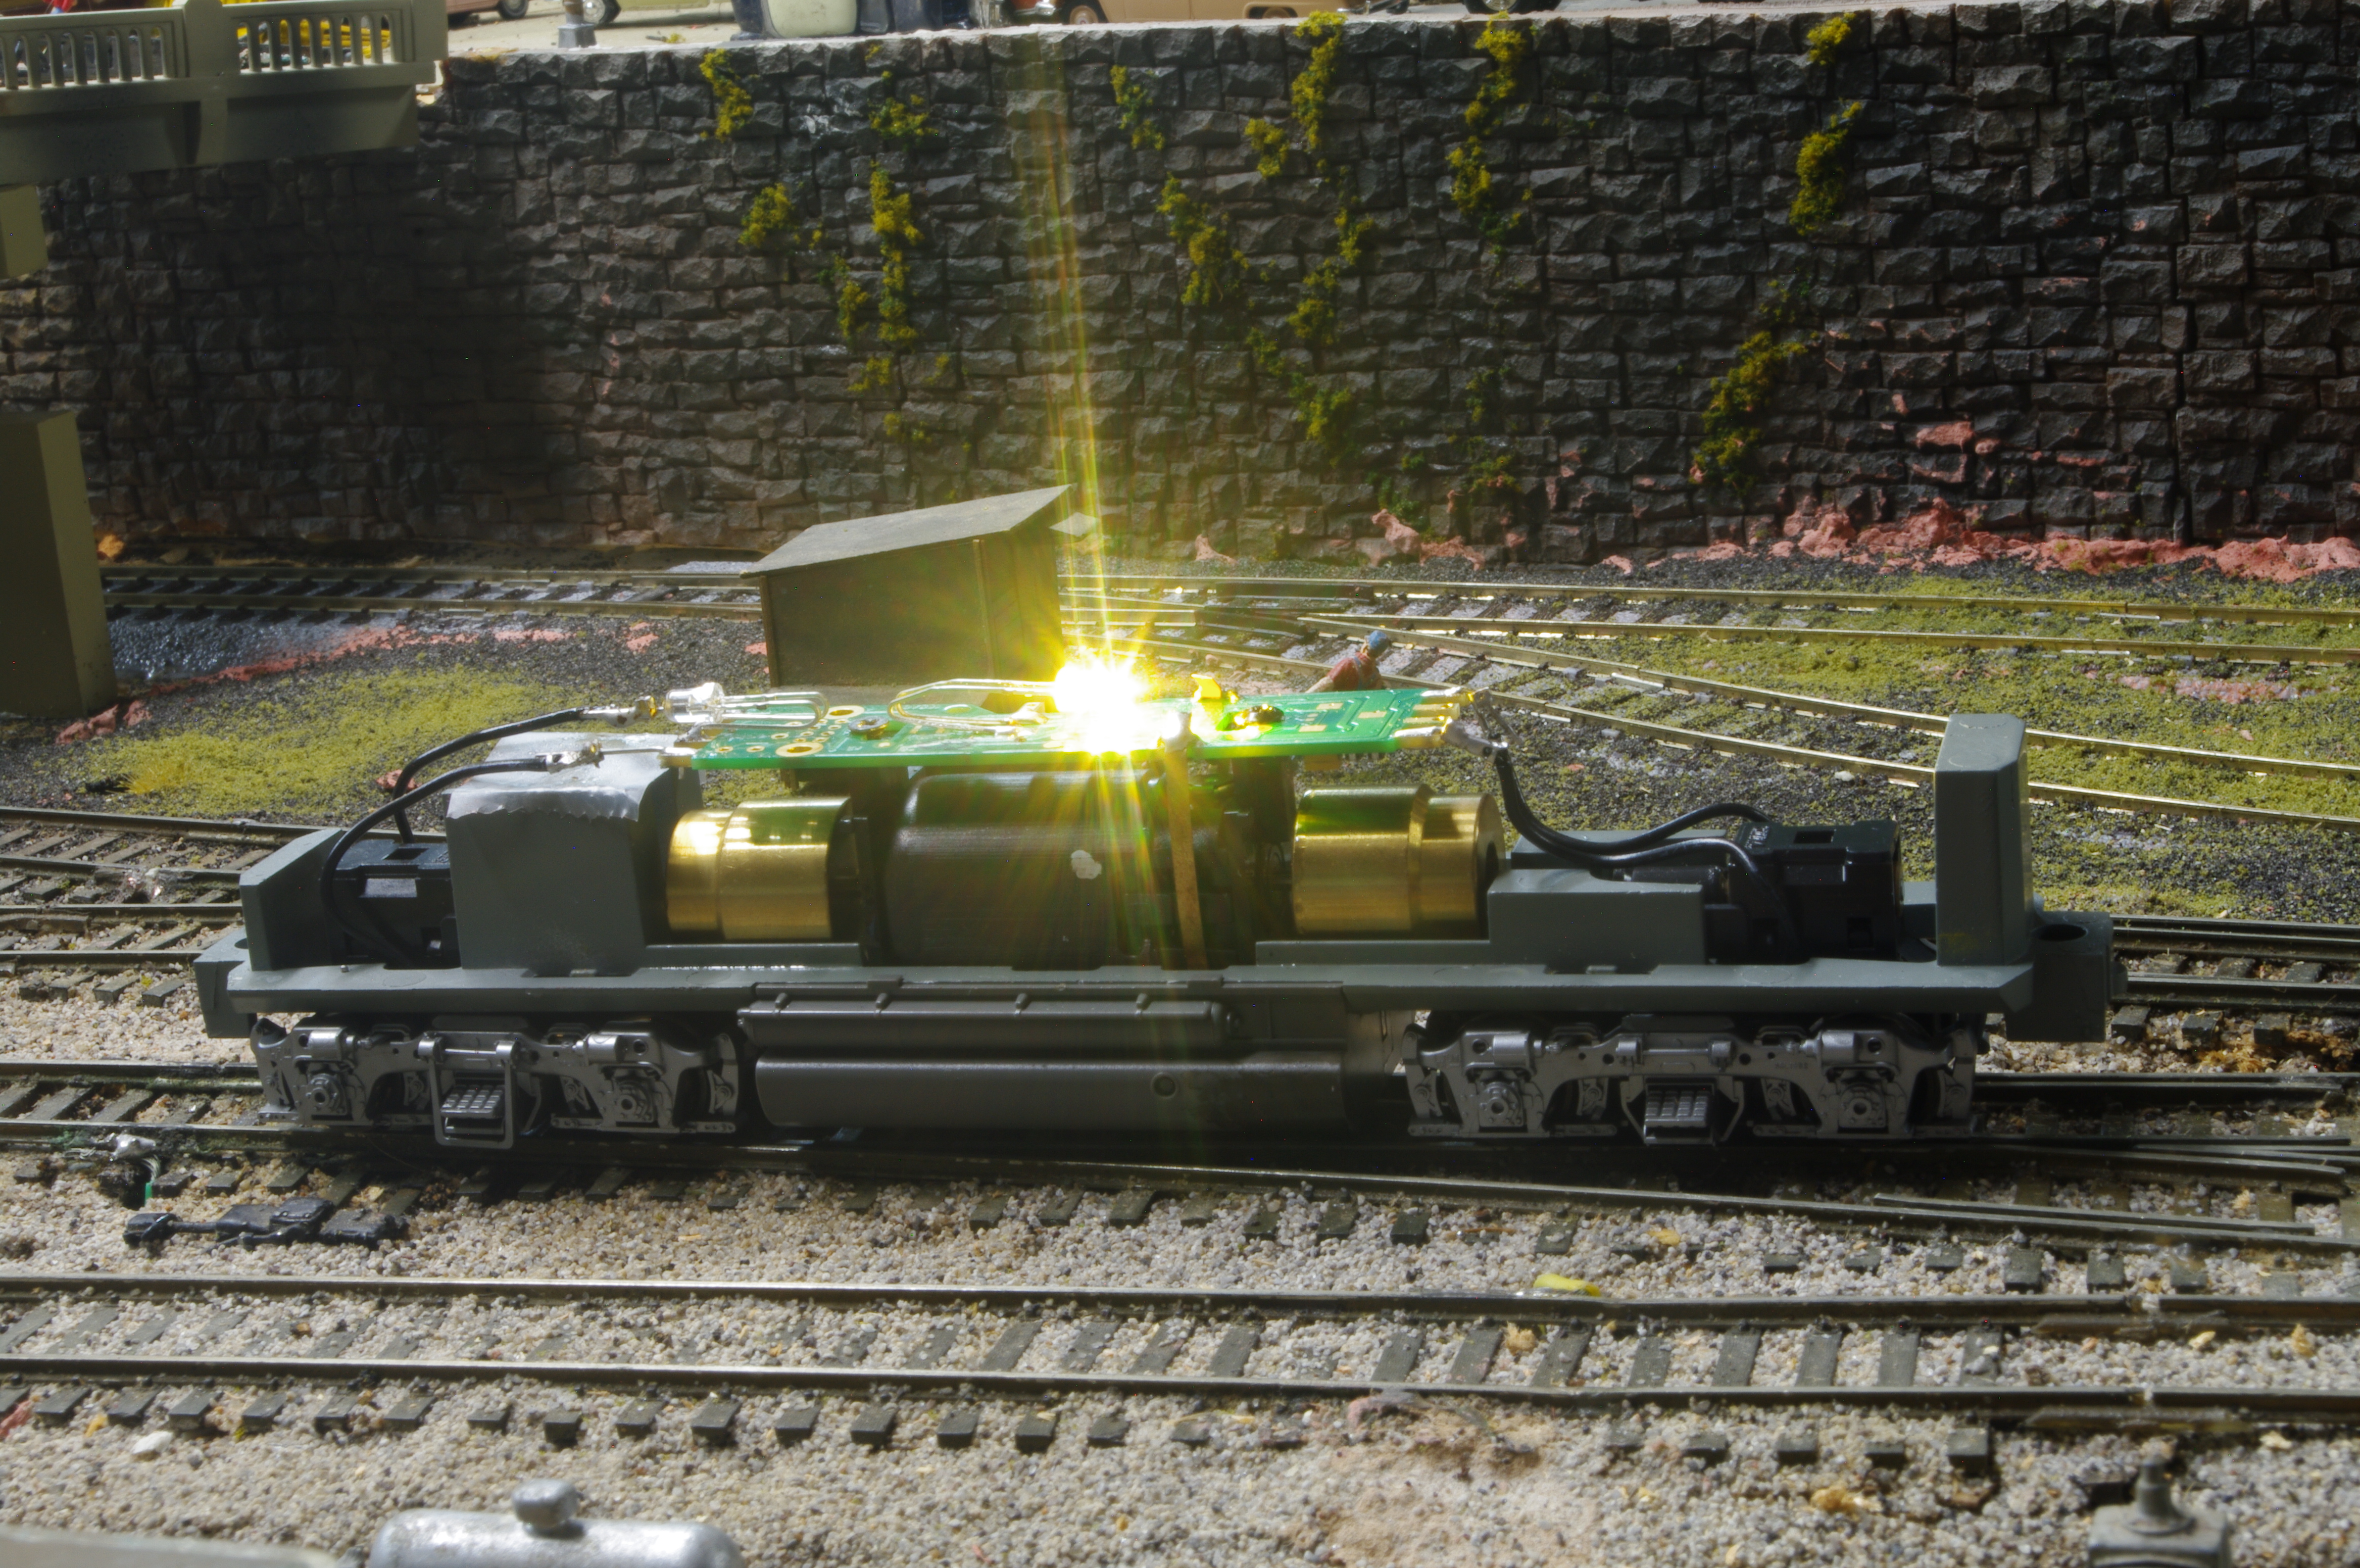
Digitrax DH165K0 Decoder In A Stewart F3A

The Digitrax DH165K0 decoder is meant for 1980s and 1990s Kato HO locos, including those made as part of the Atlas Kato yellowbox line, the Kato-only GP35s from the 1990s, and locos Kato built for Stewart, including their F units and Baldwin road switchers. Their biggest advantages are contacts that mate directly with the flat brass motor contact strips, as well as wire extensions that match the Kato track power wires from the locomotive trucks.

It isn't quite drop-in, but it's not too much harder than an 8-pin plug and play installation. The biggest complication is the need to solder LEDs to the decoder for lighting, including the need to observe the LED polarity.

Here's a DH165K0 mounted in the chassis of a Stewart F3. The F3 and other F unit models with Kato chassis date originally from 1987, so they are the same vintage as Atlas Kato locomotives, and mechanically and electrically they're very similar.

Although the Stewart F units were strides ahead of what had gone before -- especially the redoubtable Athearn F7 -- later units from Athearn Genesis, Walthers, and Broadway Limited have surpassed them in paint and detail. In particular, the Stewart locos came without grab irons or handrails, and they lacked other common details like lift rings. Modelers had to add separate details from sources like Detail Associates and Details West and supplement the paint with decals from Microscale. This turned out to be quite a task for each unit, and I'm grateful for the newer models that have saved all the extra work.

Stewart also had a one size fits all headlight for units that had either a single headlight in the upper position or an upper light and a lower one in the loco nose door. The chassis casting wouldn't allow installation of a bulb or LED shining through the lower position alone. From the box, the A units had an incandescent bulb shining through a brass tube leading to the upper headlight housing.

In this unit, I replaced the incandescent bulb with a wired LED soldered to the auxiliary F0F pads at the center of the decoder. The LED was a little too big to fit inside the brass tube, but I found that if you simply let the LED sit in the circular opening for the tube in the A unit plastic coupler mount, it will stay there.

The upper and lower headlight lenses on the locos with dual lights are a single clear plastic molding, so that light from the upper location bleeds down into the light in the door. Without a great deal of extra work, this is as good as you're going to get, and while prices on eBay for these units vary widely, the small price differential between, say, a Stewart without a DCC interface and no handrails versus a comparable current-run DC-only Walthers Mainline loco, even with basic detail, makes the Walthers Mainline a better choice.

On the other hand, I coilected a lot of these Stewart locos in the 1990s when they were the only thing available, and I think if you have them, they run very well, and they're worth the DCC upgrade.

Sunday, September 17, 2023

Kato 1990s HO GP35s And The Digitrax DH165K0 Decoder

The Kato HO GP35 was originally released about 1992, and it was reviewed in the September 1992 MR. Kato re-released the model in 2015 with two big updates, draft gear boxes that were compatible with Kadee couplers, and a PC board with an 8-pin DCC socket. The 1992 model, which had more in common with the 1980s and 1990s Atlas Kato HO models, didn't have these features.

However, unlike the Yellowbox Atlas Kato locos, it did have cab interior detail. Although this was rudimentary in comparison with contemporary high-end models, it was an improvement, but it did affect DCC conversions of the 1990s GP35, since the front light bar ran through the cab interior and requires a different style of LED mount on a decoder. The Digitrax DH165K0 is the only decoder on the market that I'm aware of that's specifically designed to accommodate this problem with the 1990s Kato GP35.

The DH165K0 instruction sheet details rthe installation procedure, including how to solder LEDs to the decoder. A finished Kato GP35 chassis with a DH165K0 and LEDs soldered on and set up for bidirectional lighting is shown below:

The decoder has solder pads that allow a forward-facing LED to be mounted in the center of the decoder to interface with the front light bar that runs through the cab and terminates well behind the cab rear wall. The rear-facing LED can be mounted on the rear of the decoder. Some care has to be taken with both to keep them from getting in the way or either light bar, but it's possible to mount directional LEDs without cutting the light bars, unlike with the Atlas Kato HO locos.

Another problem that's partly visible in the photos above is that the cab interior can push the wires leading from the front truck to the decoder out of position when you reattach the shell, which can potentially result in the wires rubbing against the universal shaft that leads to the front truck. This can result in noisy running, so you have to be careful to make sure those wires are out of the way in decoder installation.

A problem with the 1990s Kato GP35 is also that it was meant to use horn-hook couplers, and the pilot and chassis don't quite match the old Kadee #5 style coupler box. They don't match the newer Kadee whisker-style #148 coupler box at all. You're best off using #5 style coupler boxes with the "ears" completely cut off, and then the whole assembly filed or sanded slightly thinner. You can tap the existing hole for the coupler mount in the chassis with a 2-56 tap and mount the box with a #2 machine screw.

I had a small backlog of Kato 1990s GP35s that I'd hesitated to convert to DCC until I discovered how much easier the DH165K0 makes the job. Here are two I've recently done:

You can see the LED-powered headlight especially well on UP 762. I still need to add Shell Scale UP style numberboards on this loco. Both locos are also still waiting for prototypical horns.

Wednesday, September 6, 2023

I've Found A Good Solution For Adding DCC To Atlas Kato HO Locomotives

I became a dedicated collector of Atlas Kato yellowbox HO engines from their first release in 1985. The 1986 RS-1 and the 1990 GP7, with their heavy metal frames, were even better. I was a late adopter of DCC, starting only in 2012, so I'd accumulated a good number of Atlas Kato locos, all of which had been developed before DCC arrived in the mid 1990s. This meant that at some point, I'd have a project on my hands to convert all of them, and none would have anything like an 8-pin socket for an NMRA plug.

At various times I've tried the NCE DA-SR and the Digitrax DH165A0, which are nominally intended for Atlas locos. It's only been very recently that I'd even heard about the Digitrax DH165K0, which is nominally intended for Kato HO locos without 8-pin NMRA sockets. But other than the Atlas Kato yellowbox locos, I think the Kato HO GP35 is the only one that doesn't have an NMRA socket, although the old pre-Bowser Stewart Kato locos are also compatible with the DH165K0.

But I finally tried a Digitrax DH165K0 on an Atlas Kato HO GP7:

There are two big advantages to the DH165K0 over the DH165A0 for Atlas Kato locos. The first is that the contacts for the motor leads are designed specifically for the flat brass strips that reach up to the Kato plastic distribution plate on top of the motorr that carries the contact wires from the trucks and the single incandescent headlight bulb. The second is that the DH165K0 carries wire extensions from the track power nubs at the end of each end of the decoder that correspond to the former brass wires on the Kato plastic contact plate over the motor. Both make the conversion more of a drop-in with less need to strip the track power wires from the trucks or solder new wires to the flat brass motor contacts. Also, the interface between the flat brass strips and the decoder gives you a positive forward and reverse for the install without the need to test the motor polarity.

I've also found you can bend golden white LEDs as shown in the photo above and solder them directly to the headlight contacts on the decoder for bidirectional LED headlights.

With the bidirectional LEDs installed as shown, you need to shorten the light bars for the headlights. You can do this with wire cutters directly on the light bars still in position the body shell. There is no need to flatten or polish the cut ends for the light to pass through to the headlights on the shortened light bars.
In the 1990s I got four Altas Kato Illinois Central GP7s. I renumbered two of them with the old Herald King decals, which I think worked out well. I got four due to family connections with the IC, as my uncle worked variously for the Lackawanna, the Western Pacific, and the Illinois Central, winding up his career as the CEO of IC.

Sunday, August 27, 2023

Renewed Scenery Work

Last December I posted on the start of new scenery work on a junk yard surrounded by California San Francisco Bay area scenery. Progress was sometimes slow and frustrating, but I've finally made some satisfactory progress on the scene. I was prompted by this photo I posted last week:
I could see I had the start of a good scene, but I needed to finish it out so that full scenery would at least be visible surrounding any loco that I photographed here. This is what the frame looked like without a loco in the foreground:
After a week of work, this was the improvement. Still some touchup work needed, but basic ground cover has been extended:
Here's the current view looking toward the junk yard, which is a Bar Mills Bull's Salvage kit plus various cast resin junk yard items:
Oak and palm Trees, yellow grass, and brush still to come.

Sunday, August 20, 2023

Two More DCC Projects

I've managed to make some more progress on DCC installs. The first is an Atlas Silver Southern Pacific FM Train Master:
Although these came with 8-pin NMRA DCC sockets, the wiring was otherwise bare-bones. There is a circuit panel at each end of the hood behind the headlights for a number of SMD LEDs that light up the headlight, warning light, and number boards, but they're all wired together, and they all operate only together via F0 forward or reverse. If you want to set up the oscillating warning light to turn on and off separately and shine brighter and less bright, you basically need to get rid of those factory circuit boards, add wiring for new LEDs, and start over with a decoder that has extra lighting functions.

This didn't strike me as worth the extra effort, especially as the SP also had larger number boards to carry the train numbers for the peninsula commutes. The bottom line is that down the road, someone is going to have to issue a next-generation Train Master model, likely not in my lifetime if ever. On this one I simply installed a Digitrax DH126P and called it done. Looking at the photo, I see I need to add an SP 5-chime horn.l

The Train Master inspired me to pull out a couple of Keil Line ex Holgate & Reynolds SP bi levels I built from kits almost 30 years ago. I think they were old stock and out of production even then.

I also installed a Digitrax DH165A0 decoder in an Atlas Classic Tidewater Southern RS-1. I'm not sure if Atlas ever did a run of these with 8-pin sockets. This one didn't have one.
The unfinished scenery in the background is meant to be a start on some Northern California-style landscape that I started maybe a year ago and left to simmer. Now that I've tried using this scene as a photo backdrop, I'm going to resume work on it.

Sunday, August 13, 2023

Walthers/Life Like DL-109 DCC Install

I'm continuing to plug along with installing DCC in locos I've collected in the pre-DCC era. The latest is this Walthers post-Life Like DL-109:
This is an easy plug-and-play install using a Digitrax DH165L0 decoder. The old Life Like circuit boards, which Walthers continued to use, were backward from the usual standard, with male 8-pin prongs on the board itself, rather than sockets for the 8-pin NMRA plug. The Life Like circuitry had an 8-pin socket, which you remove from the Life Like circuit board, and you discard the circuit board entirely. You then replace the circuit board with the Digitrax decoder. No soldering is needed, and the Walthers version of the loco already has an LED headlight.

The only difficulty I found was that the front coupler on these units sits in a unique swivel mount that easily falls apart and scatters its pieces when you unscrew it to remove the loco shell. I spent quite a lot of time retrieving the parts and getting things back together once I installed the decoder, but now I know what to look out for in the future, since I have another New Haven and two Rock Islands still to do.

Sunday, August 6, 2023

Checking In On California High Speed Rail

A California high speed rail project connecting Los Angeles and San Francisco was originally proposed in 1996. By 2008, the project was put to voters in Proposition 1A, with the full project intended to be completed in 2020. It has successively fallen short of all its goals, and by February 2019, Governor Newsom announced the project would be cut back to a segment between Madera and Bakersfield, 119 miles. Newsom implied that it would never be completed between Los Angeles and San Francisco.

Construction on this limited section began in 2019. I've checked in on progress now and then on trips up the San Joaquin Valley, but there's actually not much to see. The first photo below is progress on a jumpover where the high speed line crosses over the BNSF at Shafter, just north of Bakersfield. I took all these photos in May 2022.

Here is another jumpover near Wasco, a little farther north.
These are pillars to hold up the largest viaduct on the current project, 6000 feet long, passing over highways and the San Joaquin Valley Railroad in Hanford.
A discussion thread on the Altamont Press board has recently pointed out that although construction of roadbed and bridges is under way, the US Department of Transportation is so far only prepared to fund track, signals, and "maybe" electrification on the current 119 mile Bakersfield-Madera segment. Funding of any further segments on the whole route is currently unlikely, and in fact the precise route either north to San Francisco or south to Los Angeles has never been established in any case.

But even if track is laid on the 119-mile segment, there won't be any trains to run on it. The discussion raised the possibility that existing California Department of Transportation equipment with F59PHIs, Siemens Chargers, and bi-level California cars might be used and rerouted onto the high speed infrastructure off the BNSF line currently used, but these are designed for a maximulm speed of 125 mph, not the 200+ mph originally intended for the project.

An additional problem is the jumpovers currently being built for the line, two of which are illustrated above. These have relatively steep grades leading up to them, even though the San Joaquin Valley is largely flat. Pure high speed trains like those in Europe can handle this type of grade by having powered trucks under the coaches, which results in very high power to maintain speed over these hills. High speed lines aren't designed for diesel-hauled conventional coaches.

There may even be serious questions over whether the high speed rail bridges were designed to carry the weight of a loco like a Siemens Charger, which is 130 tons. Thus it's entirely possible that the billions spent on this project can't even be repurposed for "higher speed" rail in the 125 mph range.