Sunday, July 26, 2020

Circus City Union Pacific Maintenance Truck Decals

Ever since Boley came out with various truck models in the early 2000s, I've been looking for decal sets that would let me letter them for railroad maintenance of way service. There have been some false starts and not-so-good offerings on eBay, but not long ago, I discovered sets available from Circus City Decals. Thy have railroad maintenance of way sets for Boley and River Point Station vehicles, with a good variety of current Class 1s, some regionals, and other fallen flags.

I decided to try the Union Pacific set. I was most interested in putting it on the recent Walthers 949-11753 bucket lift truck, which comes in white with some railroad emblems, but these are all generic. The Circus City decal sets have more specific prototypical lettering, stripes, and other data. Here's the Walthers cherry picker with the Circus City decals and stripes applied:

I don't know if the UP has actual cherry pickers that closely resemble the Walthers/Boley model, but it does have somewhat similar vehicles for reaching overhead structures, yard lights, etc. The general layout of UP lettering for trucks like this is similar to the fuel oil truck below:
Typically there's a UP shield on the cab doors, a number and sometimes registration data in black, and two sets of parallel yellow stripes on the hood and doors, extending back over the body. The Circus City set gives the shields, data, and stripes. There's enough stripe material to do two of the larger Walthers/Boley trucks.

There is no lettering diagram provided with the Circus City decal set. Luckily, I've photographed dozens of UP trucks on railfan excursions, so I had photos to work from. I printed one out for reference when I worked on three trucks I had on hand:

The dump truck was a former Boley model I picked up some time ago. The dump body was silver, and I airbrushed it white in hopes that one day decals for UP would be available. I finally got lucky. I think Walthers now has an all-white version of this truck.

I made up the little truck on the left from pieces left over from a kitbashing project using former Boley body and chassis parts. If I can scrounge other bits and pieces, I'll finish it to look something like this loco service truck I found at Dolores Yard near LA:

Sunday, July 12, 2020

Finishing The Paper Container Stacks

I finished the paper container stacks that I began in the last post. I decided to aggregate them with the background flats that had previously been behind the Department of Docks complex into a single unit, I found an image of stacked container ends on the web, resized it to HO, mounted it on a backing piece that I made pretty robust to prevent warping, and formed everything into a 90-degree corner.
I left it overnight to dry standing on end so I could be sure it would be a single, rigid piece.

When it was completely dry, I moved the unit to its place behind the Department of Docks. What I like is that it fills the background spot, but it doesn't call attention to itself, even though it helps establish atmosphere. It fills the corner and partly deflects attention from the ventilation duct that's behind everything.

I wouldn't rule out finding more images of stacked containers on the web, resizing them as needed, and adding them as an even higher backdrop behind the ones in the corner, to further deflect attention from the vntilationduct.

Sunday, July 5, 2020

Paper Container Stacks

I post here now and then on my adventures with making structures from photos I find on the web. I decided to investigate what might be done with the paper container stacks that are available on this site, which has a section for Free printable stacks of 40 foot shipping containers. There are several cautions here. Like everything that's "free", this really isn't. The download is free, but I find these things eat ink fast, so the cost of ink, foamcore, glue, blades, and photo paper will probably be a couple bucks per stack once you're done.

Second, the scale of the drawings is a puzzle. The drawings are represented variously as N, HO, or other scales, but once you print them out, they aren't. You need to print out a drawing on plain paper and measure it against a scale rule. The container in the drawing may come out to something like 32 feet in HO. You then need to divide 40 by 32 to get the ratio to enlarge the drawing. I found 118% was right, but your printer and computer may vary. I opened the downloaded picture in MS Paint and resized it 118%, When I printed the image, the 40 foot container came out to HO 40 feet long.

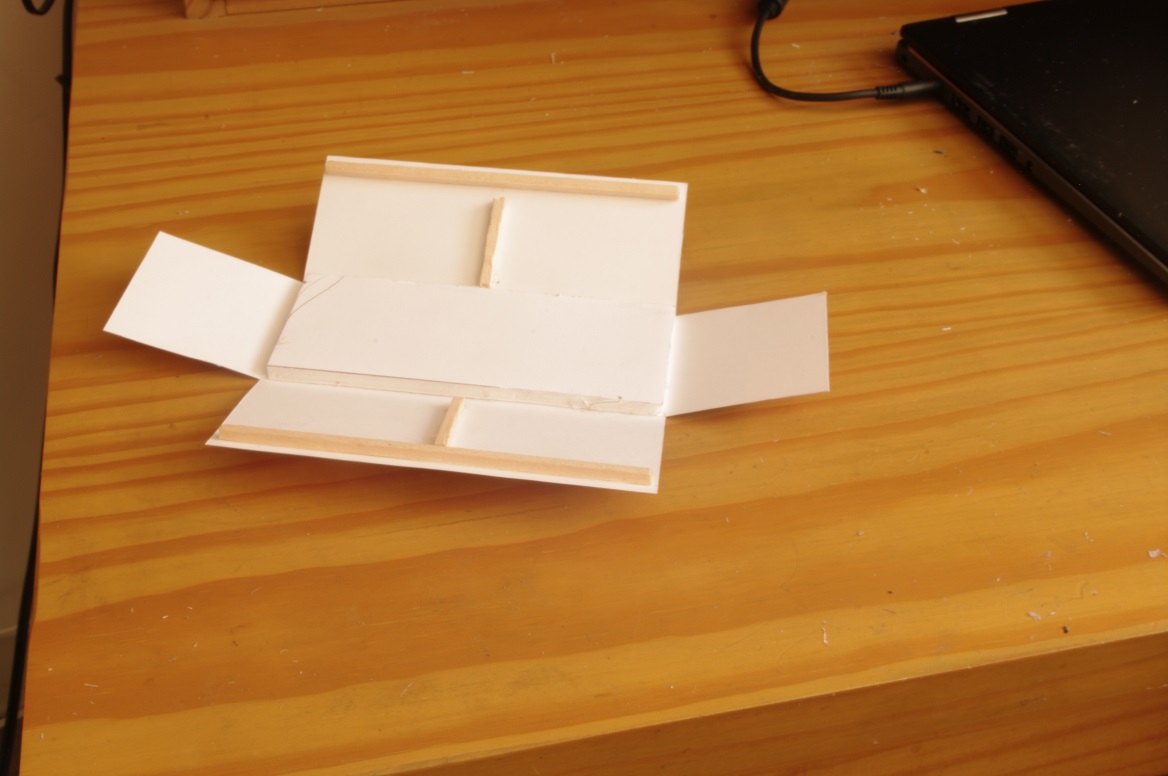
I used glossy photo paper to print the models. I had it on hand, but new containers have glossy paint, and I like the slightly glossy look of the finished product. I cut the printed image out as shown below:

I scored the fold lines lightly on the backs of the images and folded them with the help of a metal rule. Then I cut pieces of foamcore slightly less than 40 x 16 scale feet to back up the roofs and form a floor. This helps maintain the structural integrity of the finished product, and the floor makes sure the bottoms of the sides are straight.
Then I added additional bracing from stripwood. In my case, I save used fireplace-barbecue matches for use as structural bracing.
I finish the basic box by adding the floor, with the bottom stripwood bracing serving as a ledge to mount it accurately. Then I add more stripwood braces at the edges of the sides to serve as stiffeners, as well as to provide a surface to glue the ends in place.

With the box turned right side up, the remaining task is to fold the ends down and glue them in place.

I used light rubber bands to hold the ends in place while the glue dried.
One thing to keep in mind is that even if I work as carefully as I can, these things aren't going to come out perfectly. They're background models, probably with a good side to face the viewer and a less good side to face away, and they shouldn't be put near a mass-produced plastic container model. However, that said, they're cheap, a fun project, and good for filling a background spot. I'm turning to finishing up a harbor-waterftront scene on my layout, and at least for now, they have a place:

Sunday, June 28, 2020

Reopening Projects

Train stores in the Los Angeles area have reopened for in-store shopping, and I'm even starting to think about a railfan excursion up to Tehachapi or Cajon -- Tehachapi carries the biggest risk, since it takes a lot more gas with the possibility that there won't be many trains. Cajon is more reliable but also a little same old-same old. Maybe after July 4.

But thinking about railfanning again got me back to what I actually see when I go train watching, which around here at least means practically everything is tagged.

This reminded me that I have some contemporary "Epoch VI" cars in the queue that needed work. For instance, I'd picked up an Athearn Golden West Service boxcar that had been faded and patched for SP, but it had neither tags nor post-2010 conspicuity stripes.
My local train store had Blair Line graffiti decals in stock, so this was an easy choice for getting back to normal visits there. I also had Smokebox Graphics conspicuity stripes on hand.

Athearn did a good job matching the faded blue on these cars, plus the darker patch for the SP number, but the prototypes are graffiti magnets and pretty much all actually look like this:

The Blair Line tags are well chosen to look like what you see when you go out railfanning. Typically there's at least one on either side of the car doors. Then, usually later, the railroads added the reflective yellow conspicuity stripes:
Well, that's better. It should probably also get an overall coat of road grime.

Going through old stuff, I found a Walthers Proto car I'd forgotten about and gave it the same treatment:

I found a very similar car at Sandcut near Tehachapi several years ago and generally followed it:
LW is the Louisville and Wadleigh, a Georgia short line whose reporting marks GE Rail Services uses for some of its lease fleet.

Yesterday I ran into another car in the collection that hasn't had the proper work done:

This is an Atlas car lettered for Modesto & Empire Traction. MET cars are very common on Tehachapi carrying Gallo wine to the East Coast. Atlas here has added post-2010 conspicuity stripes, but there aren't any tags! This is very hard to imagine, so this car will have to go through the shop in coming days.

Sunday, June 21, 2020

Scenery Work On The Malabar District

I've been working on detailing roads and grade crossings on the Malabar District. I decided to try Woodland Scenics Asphalt paint, which comes in a small squirt bottle like their other scenery colors. The instructions say it's supposed to be used over their Smooth It product, but it looks like you have to mix the Smooth It, and I had some spackle on hand that I think is much more convenient. The YouTube instructions with the Asphalt paint suggest aging the dark black color by sanding it with fine sandpaper, which I tried, and it worked pretty well.

I finished one grade crossing:

I'm working on a second grade crossing and scenery area at the other end of the Malabar segment.
The second shot shows the road after it's been aged with fine sandpaper. I won't add crossbucks at the grade crossing until everything else is done, to avoid damaging them.

Below is the Walthers tank car loading facility on the Paper Box segment.

The inspiration for this part of my layout has always been the San Joaquin Valley railway, and the Walthers facility can only be a small reminder of the sort of tank car industries along the SJVR:
The end loading ramp visible in the photo of the Walthers tank car loader was also inspired by a location on the SJVR:

Sunday, June 14, 2020

Illinois Central Project

I visited Chicago a number of times in my teens, and one railfan trip I always made was to ride the old Illinois Central Pullman green electrics. I've always liked the Illinois Central, and over the years I've added models to my collection. The most recent is a Walthers Mainline IC GP9 in the 1967 orange scheme.
While I now tend to get Walthers Mainline locos with the limited function ESU sound decoder installed, I had an extra ESU LokPilot Standard non-sound decoder on hand, so I ordered this one DCC ready. These locos are very quiet and run very smoothly, and they're easy to run without sound even if they have the sound decoder, so I have the option if I don't want sound to drive me up the wall. The roughly $40-50 extra for the sound version is a bargain, and it has the benefit that I don't have to fuss with removing the shell, losing screws, dislodging handrails, etc etc to install a decoder when I get it.

The orange scheme began on IC in 1967, but many IC locos remained in black well past the 1972 merger with GM&O. 30 years ago I got four Atlas/Kato GP7s lettered for IC in the original black when they came out.

I installed an NCE DA-SR decoder in this one around eight years ago. I pulled it out to see how much work I might need to do to speed match it with the new GP9, but right away I discovered it would accelerate, but it wouldn't decelerate -- par for the course for an NCE product. After quite a bit of grief, I learned the best way to keep on an even keel is to avoid NCE products. I'll need to replace this decoder now.

However, I still have three other Atlas/Kato IC GP7s that I'll need to install new decoders in, so I may as well just get on with a whole IC project.

Here's a Soho brass Illinois Central caboose I painted 30 years ago or so as well:

Sunday, June 7, 2020

Ore In The Malabar District

I posted a few weeks ago on An Atlas/Kato GM&O RS-1 that I'd had in pieces while I reassembled it with replacement parts I scrounged on eBay. Here it is completed, with DCC installed:
I assigned it to the Malabar District, the section of my layout that's made up of two connected micro layouts. It's running in quite well with its replacement pieces in the drive train:
I've been inserting ore cars into the operation in the Malabar District:
I added an ore tipple to the "industry" at the end of the district:
I kitbashed this from the rock bunker that comes with the Walthers New River Mine kit. This provides me with at least one spot for an ore car in regular operation. In the 1970s, the Chicago & North Western acquired several dozen ore cars from the Bessemer & Lake Erie. These couldn't be used on the upper Great Lakes ore docks, but they were used in all-rail service from Northern Michigan to East St Louis. The AHM ore cars are models of the B&LE cars, so they can be used for these. I relettered several with Circus City C&NW ore car decals: