Friday, May 31, 2019

Little Hell Gate

My N T-TRAK project is focusing mainly on contemporary passenger operations, and my interest seems drawn to areas like the Northeast Corridor and the Washington DC area that I was familiar with as a student. I've been watching a lot of YouTube videos of coach side and rear views from Amtrak trains. One feature of the Hell Gate Bridge route I've noticed is two pairs of towers that appear on the Bronx side of the bridge. Here's a screen shot from one such rear-view video:
I rode the Hell Gate route pretty frequently in the 1960s, but I never noticed these at the time. It turns out that these were part of another large bridge that was designed by the same engineer, Gustav Lindenthal, as part of the overall Hell Gate project. This was a four-span curved-chord deck truss over a waterway called the Little Hell Gate betweeen Ward's and Randall's Islands in the East River.
The City of New York gradually filled the Little Hell Gate, linking the two islands, and turned the landfill into a park.

The Little Hell Gate bridge was important, although it was smaller than the Hell Gate Bridge. So Lindenthal added the decorative end towers, but he made them less imposing than the end towers of the main Hell Gate bridge. And the videos indicate the towers are all that's visible from track level.

I need to add a 90-degree bend to the next stage of my T-TRAK layout, which although it's to T-TRAK physical standards, is not electrically compatible, although T-TRAK electrical standards for all but small module arrangements basically don't exist, and I don't intend to take most of my modules, if any ever, to a show.

So I was looking for prototypes that might somehow be used to justify a 90-degree turn in a passenger environment, while I was becoming more intrigued with the idea of Lindenthal's Little Hell Gate towers. Then inspiration struck: heading south, the Hell Gate route makes a near 90-degree left turn after the Little Hell Gate bridge to reach the main bridge:

So from my point of view, we're in T-TRAK world, where we're looking at modules with highly compressed vignettes. So I'm going to start with the southernmost pair of towers on the Little Hell Gate bridge and include the 90-degree turn afterward on a standard 12-inch radius module. The tower locations are shown in red below:
This conveniently leaves out both the Little Hell Gate and the Hell Gate bridges, but it does include a section of viaduct running mainly over a park, and it gives me at least one pair of those towers, which fascinate me. What I plan to do is get a Masterpiece Modules kit for a standard 12-inch corner module with a depressed deck, on which I will use Kato viaduct track.

For the towers, it should be fairly easy to come up with rough dimensions from screen shots at track level assuming the height from rail to the bottom of the catenary bar between the towers is 25 feet, and calculating their length and width using the track gauge in this down-on shot from Google Satellite:

Wooden balls in various sizes are available as craft items. I am thinking the closest size in N scale would be 3/8" or 7/16". I think I will build the towers themselves from sheet basswood, attach the balls to them with dowel, and build up the pagoda-style roofs with spackle.

I think one of the Kato N scale catenary structure styles is close enough to use on the viaduct as well.

Friday, May 24, 2019

NCE Illuminator and Just Plug Lighting Features In "Springfield"

I've brought the "Springfield, MA" Amtrak station module to the point where all the former features of the temporary cassette have been relocated onto a module that matches full T-Trak specs. But as I mentioned in my last post, I installed an NCE Illuminator lighting decoder under the module surface that's set up to work with the Woodland Scenics Just Plug lighting system. The benefit is that I can run lighting in any module off the DCC bus, and on a layout as small as mine, the DCC bus in turn simply runs through the track and the Unijoiners from module to module.

This allows no extra wiring between modules, but each module is separately addressable. All you have to do to reconfigure the layout is disconnect the modules and reconnect them using the Unitrack Unijoiners, and the lighting goes with them. This is superior even to the stock Just Plug system from Woodland Scenics.

The first thing I wanted to try was using Woodland Scenics wall mount lights on the building flats in the background. I was inspired by this video from Woodland Scenics:


The video makes things seem a little bit easier than they actually are, possibly because I was working with the N scale version of the product. The hookup wires are quite difficult just to see, much less to cut, strip, and solder into a connection to the linker plug. I struggled with this for most of an afternoon, but it did all work the first time, just not entirely plug-and-play. Here's the first result, which I'm very happy with:

The NCE Illuminator has three available ports. The two wall mount lights together take up one port, as explained in the video. This left two ports for another feature. I decided that I wanted to add platform lights under the butterfly canopies of the Walthers Cornerstone platforms. I painted the canopy supports and edges oxide red to match the baggage elevators, as seen in the prototype photo in the last post. Eventually I'll brush paint the canopy top surfaces gray. Under the canopies, I mounted Just Plug cool white stick-on LEDs. I cut notches in the supports that allowed me to run the wires to the LEDs under the roof and to the platform ends:

Then I mounted the canopy-LED assemblies onto the platforms, which I'd previously painted, along with adding the yellow line decal stripes:
Then I assembled the completed platforms onto the module. Here's the result, after programming the NCE Illuminator:
But as I said, each Illuminator is separately addressable, provided you program it with an address. Following my system, this is Module 7, and the first Illuminator on each module is numbered 90, so this is accessory number 790. So I can call up Accessory 790 on my NCE Power Cab and turn it on (1) or off (2). Here it is turned off, but as you can see, power is still going to the track:

Sunday, May 19, 2019

Redoing The Staging Cassette

In my last post, I mentioned that I had more in mind for a staging cassette that I roughed out from scrap pieces of white foam and foamcore earlier this year. This was little more than a proof of concept, and it was pretty flimsy, but it turned out to be so useful for my T-Trak project that I decided to upgrade it to full module specs. One thing that encouraged me was that I found that Masterpiece Modules makes a double width-half depth module kit. Overall dimensions are roughly 24" by 6.5", which is a little larger than the staging cassette I roughed out.
One feature I like about Masterpiece Modules is that it provides predrilled holes that match the mounting holes in Kato Unitrack, along with self-tapping screws to fasten the track down. So I added some Unitrack sections I had on hand after painting the top surface with gray craft paint:
I didn't worry about the transition from concrete ties to wood, as this sort of thing is sometimes visible on Amtrak routes in the northeast.

Among other things, I decided to make this module potentially compatible with a standard T-Trak layout at a meet. Primarily the difference between my modules and T-Trak standards is that mine have a BWBW wiring scheme, while T-Trak uses BWWB. (I like BWBW because it lets me use crossovers between main lines and operate smoothly with DCC.) But I added a DPDT toggle that will reverse the wiring on the inside track from BWBW to BWWB if needed.

In addition to the terminal strip, I've added an NCE Illuminator DCC lighting decoder that will allow me to use Woodland Scenics Just Plug lighting features. The toggle faces the inside edge of the module to avoid having it where it could inadvertently be thrown by casual observers.

I added platforms from the roughed-out cassette, and on the inside I added the tie strip from an old section of N flex track to represent an abandoned track. I started some basic "dirting in", but this will eventually be the last thing I finish.

I made a second baggage elevator to match the first one and installed building flats from the Anglie's Trackside Flats eBay store, most transferred from the original cassette:
I will add Walthers Cornerstone butterfly platforms to the left of the baggage elevators. This will bring the scene to a closer approximation of the Springfield, MA Amtrak station.

Sunday, May 12, 2019

Another T-Trak Update

One of my main N interests is Chicago Metra. I recently got one of the new Kato F40s in the newest Metra paint:
Installing a decoder was a comedy of errors. For starters, the Kato writeup recommends the TCS K0D8-C decoder, but this is actually meant for Kato F40s without the red tail light feature for running in reverse with Metra push-pull. The correct decoder per the TCS website is the K5D7. To make things worse, I had already installed a K5D7 in another Kato Metra F40, but I simply checked the Kato writeup and ordered the wrong decoder.

I decided what the heck, as long as I'd ordered the K0D8-C, I'd install it. But then I bungled the Kapton tape wrap on the brass pickup bars and got the tape bunched up a little too much on one of them. This kept the decoder from making proper contact, and the loco wouldn't run. I wasn't relishing the job of unsoldering the motor tabs and debugging what I'd done wrong, and I held off on fixing it, figuring that what the heck, when my budget next allowed, I'd order a Kato Amtrak F40, which I'd been intending to get anyway, with a TCS K5D7 and swap them out into the correct locos.

I finally did this today, and all's well that ends well. And at least in downtown Chicago, you pretty much never see a Metra F40 by itself, so here are my two together:

The photo backdrop is the staging cassette I've been using with my T-Trak layout, moved to a bookshelf where I can easily take photos with my camera on a tripod:
This has led me to some new ideas that I'll begin to cover later in the week.

Monday, May 6, 2019

Richmond Main Street Station T-Trak Update 2

The process of roughing out the basic station with Foamcore is continuing. I've completed the basic framework for the train shed:
Fairly detailed drawings of the train shed (but not the headhouse) are available on the web as part of the Historic American Buildings Survey, so the dimensions of the train shed are from these drawings, and I can have pretty good confidence that the shed, or the piece of it in the model, is close to N scale.

I had to eyeball some of the dimensions for the headhouse, although the floor plan dimensions from a different source match the dimensions in the drawings of the shed. The fully roughed out headhouse is off by a few scale feet here and there, but the discrepancies are within the range I would tolerate with a commercial product. (A laser cut type kit for this structure would be hundreds of dollars. Total cost to date for this project is about $15.00)

However, the drawings are as-built. As restored, there are no tracks inside the shed, which is used only as an event space by the city. Thus all I'll model will be the exterior, mostly the roof.

I'll add the basic roof from 1/32 basswood sheet. As you can see, I'm starting to find and add "wallpaper" to begin detailing the sides of the headhouse. The next step will be to use red tile texture for the basic headhouse roof.

Thursday, May 2, 2019

Richmond Main Street Station T-Trak Update

I've been able to rough out the headhouse and a base for the abbreviated train shed using Foamcore:
I was able to get many basic dimensions off the web, and I eyeballed others from photos. The model is therefore pretty close to N scale. The Kato P42 and Amfleet are there to show proportion. The thing is meant to be a drop fit into a Masterpiece Modules double-wide module with recessed deck.

Cracks and gaps will be filled with spackle. The roof peaks will be filled with stripwood sanded to shape. Since the tracks and platforms are on the second-floor level of the prototype, the base is there to bring things up to the correct height once it's installed in the module.

Architectural details will be gradually added with textures, photos edited to size, and whatever else I can scrounge. I expect this will be a work-in-progress more or less indefinitely.

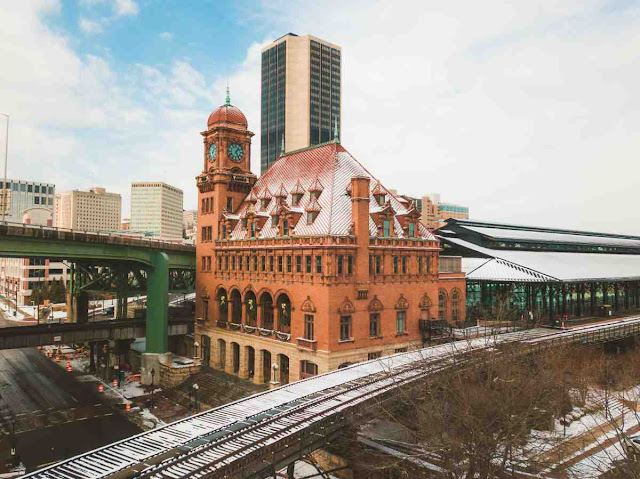
Dimensions have been tweaked slightly to allow for Unitrack, T-Trak standard dimensions, and Walthers station platforms, but otherwise, I'm trying to get this as close to N scale as I can, following the station in its current condition. Here are some prototype shots: